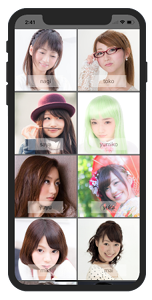
アルバムのような写真アプリによく使われますが、画像をマス目に配置するには UICollectionView を使います。基本的な設定をテストしてみます。
Xcode 11.3.1
UICollectionView
UICollectionView の設定は UITableView と似ているので、これを理解できればUITableViewも作りやすくなります。
また、セルのためのクラスを作成する方法もありますが、ここではTagを使った簡単な方法を採用しました。
1. storyboard に Collection View を設定
2. 画像の設定
3. ViewController にコードを記述
4. ViewController と CollectionView の紐付け
5. Cellの調整
storyboard に Collection View を設定
Collection View の配置
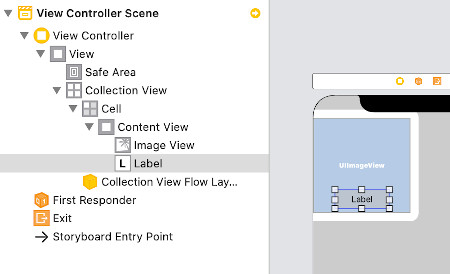
storyboard にて Collection View を View Controller に配置します。
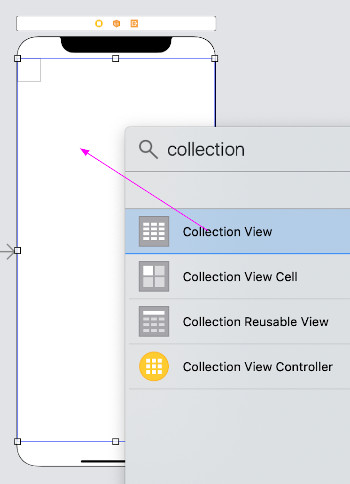
特別なレイアウトを想定していないのであれば、Collection View はSafe Area に入れておいた方が分かりやすいです。
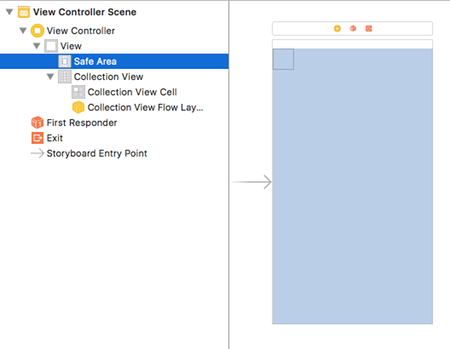
Collection View Cell 確認
基本的にはCollection View Cell が既にできています。(以前にここが問題だったのでデフォルトで入っているのでしょう)
ちなみに、ユーティリティーのライブラリーから持ってくることもできます
「View」「Collection View」「Collection View Cell」
この後UIImageViewやUILabelを入れるのでCellの大きさを調整しておきます。
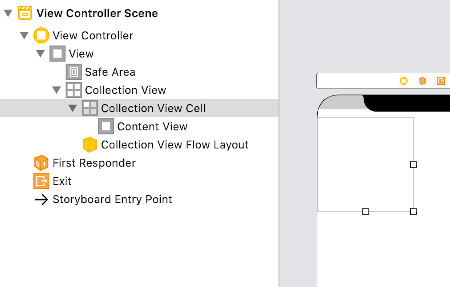
Cell の ID設定
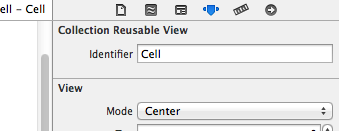
Collection Cellを選択して、Collection Reusable View にある Identifier を例えば「Cell」と設定します。これは後でコードの記述で使います。またエラーになったらここを忘れていないか確認しましょう。
UIImageViewとUILabelの配置
この Cell の中に、ユーティリティー・エリアのライブラリーからUIImageView と UILabel を持ってきて置きます。Cellが小さいときはCellを広げておき、UIImageViewはCellに一杯に入れておきます。
(好みですが、Labelの背景を半透明に設定しました。)
Tagの設定
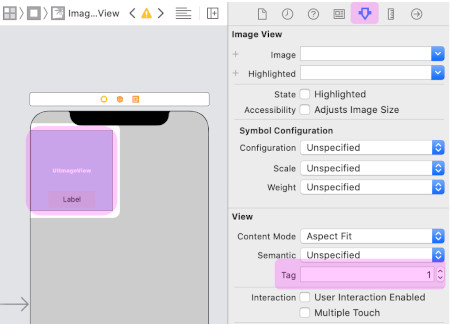
UIImageView の View Tag を「1」に設定します。
Tag番号は1から始めます。
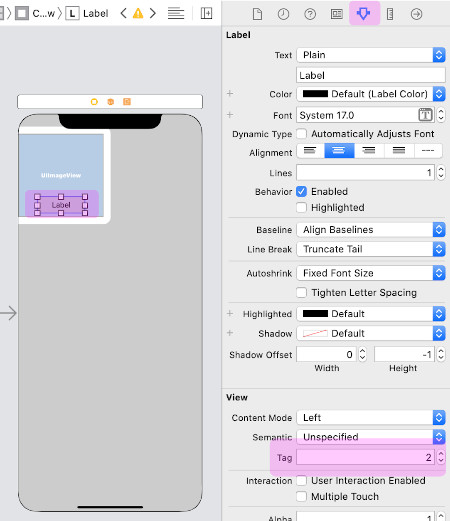
UILabel の Tag を「2」にセットします。
画像の設定
サムネイル画像を集めて、名前に@2xを追加したファイルにして、Assets.xcassets に配置します。@3xファイルも作成したいところですが、サムネイルなので大丈夫でしょう。

ちなみに、ここで使ったファイルは全て正方形ですが、エンコード(jpg,png…)も画面サイズも異なるものです。
ViewController にコードを記述
UICollectionViewDataSource, UICollectionViewDelegate を設定
ViewController.swift
|
1 2 3 4 5 6 7 8 9 10 11 12 13 14 15 16 17 18 19 20 21 22 23 24 25 26 27 28 29 30 31 32 33 34 35 36 37 38 39 40 41 42 43 44 45 46 47 |
import UIKit class ViewController: UIViewController ,UICollectionViewDataSource, UICollectionViewDelegate { // サムネイル画像の名前 let photos = ["nagi", "toko","saya","yumiko","yuyu", "yuka","miki","mai","kurumi","katakuriko"] override func viewDidLoad() { super.viewDidLoad() } func collectionView(_ collectionView: UICollectionView, cellForItemAt indexPath: IndexPath) -> UICollectionViewCell{ // "Cell" はストーリーボードで設定したセルのID let testCell:UICollectionViewCell = collectionView.dequeueReusableCell(withReuseIdentifier: "Cell", for: indexPath) // Tag番号を使ってImageViewのインスタンス生成 let imageView = testCell.contentView.viewWithTag(1) as! UIImageView // 画像配列の番号で指定された要素の名前の画像をUIImageとする let cellImage = UIImage(named: photos[indexPath.row]) // UIImageをUIImageViewのimageとして設定 imageView.image = cellImage // Tag番号を使ってLabelのインスタンス生成 let label = testCell.contentView.viewWithTag(2) as! UILabel label.text = photos[indexPath.row] return testCell } func numberOfSections(in collectionView: UICollectionView) -> Int { // section数は1つ return 1 } func collectionView(_ collectionView: UICollectionView, numberOfItemsInSection section: Int) -> Int { // 要素数を入れる、要素以上の数字を入れると表示でエラーとなる return photos.count; } } |
ViewController と CollectionView の紐付け
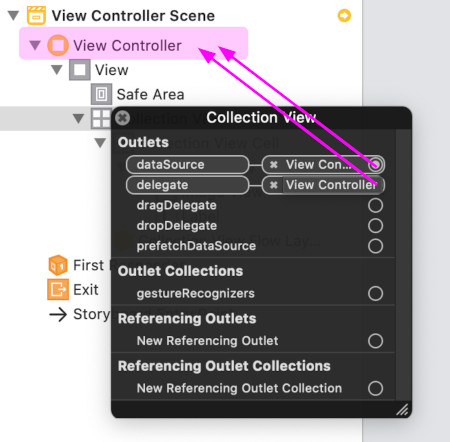
storyboard に戻ってCollection View を選択して
dataSource -> View Controller
delegate -> View Controller
とそれぞれ結び紐付けします。
ビルドして実行すると

とりあえず表示はされていますが、イマイチな感じですね、セルのサイズがスクリーンと合っていません
Cellの調整
UICollectionViewDelegateFlowLayout を使うと画面サイズに合ったセルサイズを計算して合わせこみができます。
|
1 2 3 4 5 6 7 8 9 10 11 12 13 14 15 16 |
class ViewController: UIViewController ,UICollectionViewDataSource, UICollectionViewDelegate ,UICollectionViewDelegateFlowLayout { ... // Screenサイズに応じたセルサイズを返す // UICollectionViewDelegateFlowLayoutの設定が必要 func collectionView(_ collectionView: UICollectionView, layout collectionViewLayout: UICollectionViewLayout, sizeForItemAt indexPath: IndexPath) -> CGSize { // 横方向のスペース調整 let horizontalSpace:CGFloat = 2 let cellSize:CGFloat = self.view.bounds.width/2 - horizontalSpace // 正方形で返すためにwidth,heightを同じにする return CGSize(width: cellSize, height: cellSize) } ... |
とりあえず横方向のスペースを2にしましたが、これは調整してください。
これを入れたコードです
ViewController.swift
|
1 2 3 4 5 6 7 8 9 10 11 12 13 14 15 16 17 18 19 20 21 22 23 24 25 26 27 28 29 30 31 32 33 34 35 36 37 38 39 40 41 42 43 44 45 46 47 48 49 50 51 52 53 54 55 56 57 58 59 60 |
import UIKit class ViewController: UIViewController ,UICollectionViewDataSource, UICollectionViewDelegate ,UICollectionViewDelegateFlowLayout { // サムネイル画像のタイトル let photos = ["nagi", "toko","saya","yumiko","yuyu", "yuka","miki","mai","kurumi","katakuriko"] override func viewDidLoad() { super.viewDidLoad() } func collectionView(_ collectionView: UICollectionView, cellForItemAt indexPath: IndexPath) -> UICollectionViewCell{ // Cell はストーリーボードで設定したセルのID let testCell:UICollectionViewCell = collectionView.dequeueReusableCell(withReuseIdentifier: "Cell", for: indexPath) // Tag番号を使ってImageViewのインスタンス生成 let imageView = testCell.contentView.viewWithTag(1) as! UIImageView // 画像配列の番号で指定された要素の名前の画像をUIImageとする let cellImage = UIImage(named: photos[indexPath.row]) // UIImageをUIImageViewのimageとして設定 imageView.image = cellImage // Tag番号を使ってLabelのインスタンス生成 let label = testCell.contentView.viewWithTag(2) as! UILabel label.text = photos[indexPath.row] return testCell } // Screenサイズに応じたセルサイズを返す // UICollectionViewDelegateFlowLayoutの設定が必要 func collectionView(_ collectionView: UICollectionView, layout collectionViewLayout: UICollectionViewLayout, sizeForItemAt indexPath: IndexPath) -> CGSize { // 横方向のスペース調整 let horizontalSpace:CGFloat = 2 let cellSize:CGFloat = self.view.bounds.width/2 - horizontalSpace // 正方形で返すためにwidth,heightを同じにする return CGSize(width: cellSize, height: cellSize) } func numberOfSections(in collectionView: UICollectionView) -> Int { // section数は1つ return 1 } func collectionView(_ collectionView: UICollectionView, numberOfItemsInSection section: Int) -> Int { // 要素数を入れる、要素以上の数字を入れると表示でエラーとなる return photos.count; } } |
UICollectionViewDelegateFlowLayoutの設定を忘れずに
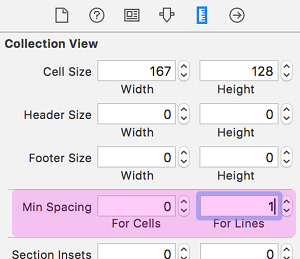
Min Spacing:
またCellの幅が2列可能な大きさなのに1列で表示されているケースなどでは、CollectionView設定にあるFor Cells と For Lines の「Min Spacing」が大きすぎるようであれば調整してください。
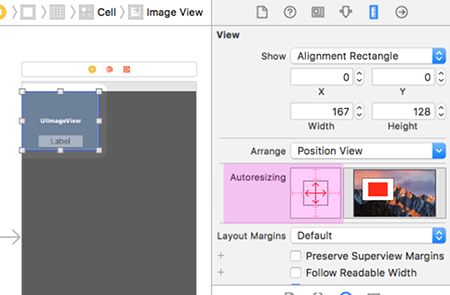
AutoResizing:
古いやり方ですがこういうのもあると言うことです。UIImageViewのAutoResizingの設定を図のようにします。これによりCellが矩形で横いっぱいになったサイズに合わせることができます。またUILabelも同様の設定をしておきます。
背景を適当にGrayにしてビルド実行しました。
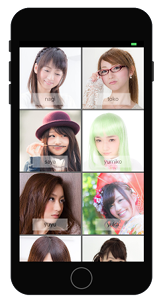
iPhone Xでもsimulatorで実行してみました。(storyboardのCollection Viewの範囲をiPhone Xで確認した方がいいかもしれません)
次はそれぞれのセルをタップしてそのセルの詳細などの情報を表示する為に画面を遷移する方法です。
関連ページ:
- UICollectionView 作成
- UICollectionView セルの選択と画面遷移
Reference:
UICollectionView – UIKit | Apple Developer Documentation