iPhone がシステムで持っている音源やバイブレータなどを再生させてみましょう。音楽再生とくれば AVFoundation の AVAudioPlayerですがAudioToolbox のフレームワークにある
AudioServicesPlaySystemSoundを使うと簡単にできます。
Swift 5.1
Xcode 11.3.1
Xcode 11.3.1
System Sound Services
システムサウンドを使う方法はその種類によっていくつかあります。簡単にIDを指定するだけのものから、好みのワンショット音楽を使うことも可能です。
SystemSoundID
IDを指定するだけでとても簡単です。IDはiPhoneでも多数選択できるように色々あります。
|
1 2 3 4 5 6 7 8 9 10 11 12 13 |
// Shutter var soundIdRing:SystemSoundID = 1108 // bell //var soundIdRing:SystemSoundID = 1000 // update //var soundIdRing:SystemSoundID = 1336 if let soundUrl = CFBundleCopyResourceURL(CFBundleGetMainBundle(), nil, nil, nil){ AudioServicesCreateSystemSoundID(soundUrl, &soundIdRing) AudioServicesPlaySystemSound(soundIdRing) } |
ファイルパスを指定して再生
端末内のシステムサウンドを直接指定して再生します。この場合ボリュームやミュートの影響を受けます。
|
1 2 3 4 5 6 7 8 |
// SystemSoundIDは0にしてurlの音源を再生する var soundIdRing:SystemSoundID = 0 if let soundUrl = URL(string: "/System/Library/Audio/UISounds/photoShutter.caf"){ AudioServicesCreateSystemSoundID(soundUrl as CFURL, &soundIdRing) AudioServicesPlaySystemSound(soundIdRing) } |
独自音源ファイル
サンプルとして mp3などをプロジェクトに追加します。30秒以下などの幾つかの制限があります。
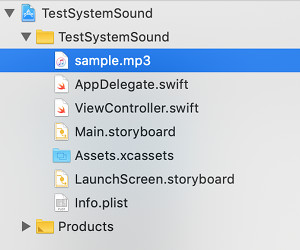
例えば、sample.mp3ファイルをプロジェクト内にaddしておきます。

|
1 2 3 4 5 6 7 |
var soundIdRing:SystemSoundID = 0 if let soundUrl:NSURL = NSURL(fileURLWithPath: Bundle.main.path(forResource: "sample", ofType:"mp3")!) as NSURL?{ AudioServicesCreateSystemSoundID(soundUrl, &soundIdRing) AudioServicesPlaySystemSound(soundIdRing) } |
バイブレータ
これだけ別処理で直接できます。
|
1 |
AudioServicesPlaySystemSound(SystemSoundID(kSystemSoundID_Vibrate)) |
サンプルコード
まとめてみると
ViewController.swift
|
1 2 3 4 5 6 7 8 9 10 11 12 13 14 15 16 17 18 19 20 21 22 23 24 25 26 27 28 29 30 31 32 33 34 35 36 37 38 39 40 41 42 43 44 45 46 47 48 49 50 51 52 53 54 55 56 57 58 59 60 61 62 63 64 65 66 67 68 69 70 71 |
import UIKit import AudioToolbox class ViewController: UIViewController { override func viewDidLoad() { super.viewDidLoad() } // system sound のIDを指定して再生 @IBAction func buttonShutter0(_ sender : Any) { // shutter var soundIdRing:SystemSoundID = 1108 // bell //var soundIdRing:SystemSoundID = 1000 // update //var soundIdRing:SystemSoundID = 1336 if let soundUrl = CFBundleCopyResourceURL(CFBundleGetMainBundle(), nil, nil, nil){ AudioServicesCreateSystemSoundID(soundUrl, &soundIdRing) AudioServicesPlaySystemSound(soundIdRing) } } // system sound のファイルパスを指定して再生 @IBAction func buttonShutter1(_ sender : Any) { var soundIdRing:SystemSoundID = 0 if let soundUrl = URL(string: "/System/Library/Audio/UISounds/photoShutter.caf") { AudioServicesCreateSystemSoundID(soundUrl as CFURL, &soundIdRing) AudioServicesPlaySystemSound(soundIdRing) } } // 新着メール @IBAction func buttonNewMail(_ sender : Any) { var soundIdRing:SystemSoundID = 0 if let soundUrl = NSURL(fileURLWithPath: "/System/Library/Audio/UISounds/new-mail.caf") as NSURL?{ AudioServicesCreateSystemSoundID(soundUrl, &soundIdRing) AudioServicesPlaySystemSound(soundIdRing) } } // mp3 ファイルの再生 @IBAction func buttonSampleWav(_ sender : Any) { var soundIdRing:SystemSoundID = 0 if let soundUrl:NSURL = NSURL(fileURLWithPath: Bundle.main.path(forResource: "sample", ofType:"mp3")!) as NSURL?{ AudioServicesCreateSystemSoundID(soundUrl, &soundIdRing) AudioServicesPlaySystemSound(soundIdRing) } } // バイブレータ @IBAction func buttonVib(_ sender : Any) { AudioServicesPlaySystemSound(SystemSoundID(kSystemSoundID_Vibrate)) } } |
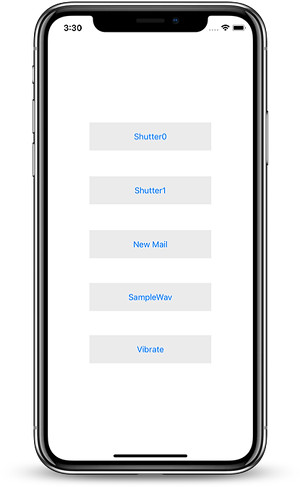
Buttonを作成してTouch up insideでそれぞれ紐付けしてテストしてみましょう。

これらのテストの確認は以下の環境設定で実施しましたが、vibraterは当然マナーモードでないと動作しません。またAirPodsはマナーモードでは音楽は聞けますが、これらシステム音は聞こえてきません。
| simulator | iPhone | iPhone(マナーモード) | AirPods | AirPods (マナーモード) |
|
| SystemSound | OK | OK | – | OK | – |
| photoShutter.caf | – | OK | – | – | – |
| new-mail.caf | – | OK | – | – | – |
| sample mp3 | OK | OK | – | – | – |
| vibrater | – | – | OK | – | OK |