iOSアプリに◯や三角などの図形を描きたい事は多いです。そんな時はUIBezierPathを使います。iOSでのグラフィックスの扱い方について見てみましょう。
Xcode 11.3.1
UIBezierPath
bezier とはベジェ(Bezier)曲線からきているのでしょうか?とすると自由曲線が描けるわけです。まず、ここでは簡単な矩形や楕円などの描画方法を試してみます。
iOS UIBezierPath Class Reference
UIView クラスを作成して直線を描く
まず押さえるところとして。UIViewからのクラスを作り、それを UIViewController から呼び出して使います。
ナビゲーションエリアでプロジェクトを右クリックして
新しくクラスを作成します
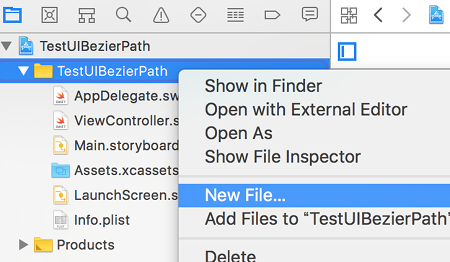
「iOS」->「Source」->「Cocoa Touch class」
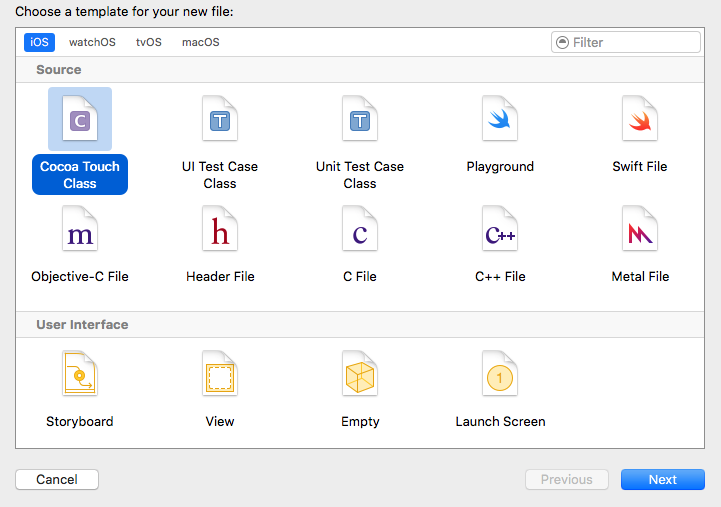
Subclass of には UIView を指定します。
ここでは TestDraw というクラスを追加
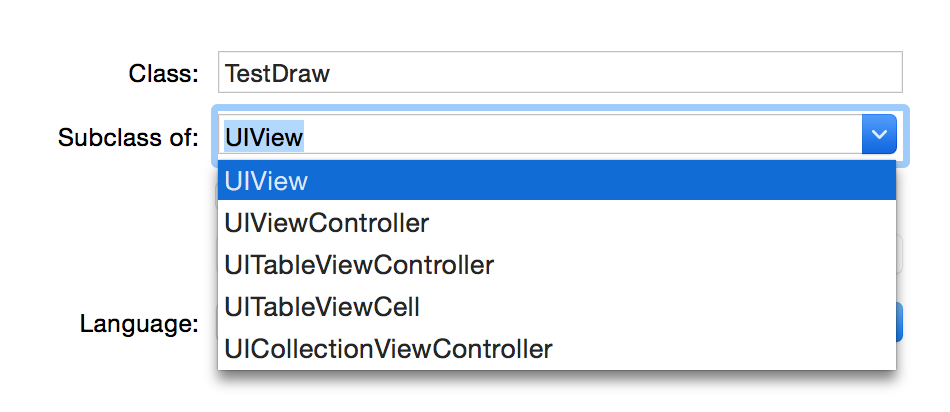
プロジェクトのフォルダ内に保存先を指定して「Create」します
TestDraw.swiftが生成されます
|
1 2 3 4 5 6 7 8 9 10 11 12 13 |
import UIKit class TestDraw: UIView { /* // Only override drawRect: if you perform custom drawing. // An empty implementation adversely affects performance during animation. override func drawRect(_ rect: CGRect) { // Drawing code } */ } |
override func drawRect(_ rect: CGRect){ }
がコメントアウトされているので、ここにUIBezierPath を使ってコードを記述します。
- UIBezierPath のインスタンス生成
- 起点の設定
- 帰着点をセット
- 色の設定
- ライン幅
- 描画セット
TestDraw.swift
|
1 2 3 4 5 6 7 8 9 10 11 12 13 14 15 16 17 18 19 20 21 22 23 24 25 26 |
import UIKit class TestDraw: UIView { // Only override draw() if you perform custom drawing. // An empty implementation adversely affects performance during animation. override func draw(_ rect: CGRect) { // 三角形 ------------------------------------- // UIBezierPath のインスタンス生成 let line = UIBezierPath(); // 起点 line.move(to: CGPoint(x: 50, y: 160)); // 帰着点 line.addLine(to: CGPoint(x: 200, y: 600)); line.addLine(to: CGPoint(x: 300, y: 280)); // ラインを結ぶ line.close() // 色の設定 UIColor.red.setStroke() // ライン幅 line.lineWidth = 4 // 描画 line.stroke(); } } |
ViewControllerから TestDraw を呼び出し、描画するフレームサイズを指定して
インスタンスを生成しview に追加します。
self.view.bounds.width
self.view.bounds.height
としてスクリーンの横幅と縦幅を取得
ViewController.swift
|
1 2 3 4 5 6 7 8 9 10 11 12 13 14 15 16 17 |
import UIKit class ViewController: UIViewController { override func viewDidLoad() { super.viewDidLoad() // Screen Size の取得 let screenWidth = self.view.bounds.width let screenHeight = self.view.bounds.height let testDraw = TestDraw(frame: CGRect(x: 0, y: 0, width: screenWidth, height: screenHeight)) self.view.addSubview(testDraw) } } |
描画領域 TestDraw はデフォルトでは不透明で黒くなっています。
isOpaque = true
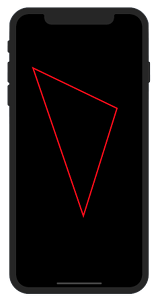
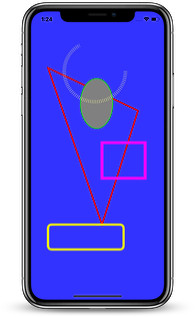
図形を描画
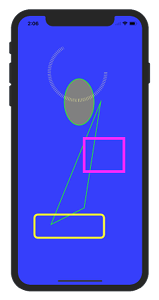
その他にも図形を描画するメソッドがあります
- 三角形
- 楕円(円も含む)
- 矩形
- 角が丸い矩形
- 円弧
また、黒の背景色を変更するには先のisOpaqueをfalseに設定します
ViewController.swift
|
1 2 3 4 5 6 7 8 9 10 11 12 13 14 15 16 17 18 19 20 21 22 23 |
import UIKit class ViewController: UIViewController { override func viewDidLoad() { super.viewDidLoad() // Screen Size の取得 let screenWidth = self.view.bounds.width let screenHeight = self.view.bounds.height let testDraw = TestDraw(frame: CGRect(x: 0, y: 0, width: screenWidth, height: screenHeight)) self.view.addSubview(testDraw) // 不透明にしない(透明) testDraw.isOpaque = false // 背景色 self.view.backgroundColor = UIColor(red: 0.2, green: 0.2, blue: 1.0, alpha: 1.0) } } |
UIViewのコードです
TestDraw.swift
|
1 2 3 4 5 6 7 8 9 10 11 12 13 14 15 16 17 18 19 20 21 22 23 24 25 26 27 28 29 30 31 32 33 34 35 36 37 38 39 40 41 42 43 44 45 46 47 48 49 50 51 52 53 54 55 56 57 58 59 60 61 62 63 64 65 66 67 68 69 70 71 72 73 74 75 76 77 78 79 |
import UIKit class TestDraw: UIView { // Only override draw() if you perform custom drawing. // An empty implementation adversely affects performance during animation. override func draw(_ rect: CGRect) { // 三角形 ------------------------------------- // UIBezierPath のインスタンス生成 let line = UIBezierPath(); // 起点 line.move(to: CGPoint(x: 250, y: 260)); // 帰着点 line.addLine(to: CGPoint(x: 100, y: 630)); line.addLine(to: CGPoint(x: 200, y: 580)); // ラインを結ぶ line.close() // 色の設定 UIColor.green.setStroke() // ライン幅 line.lineWidth = 2 // 描画 line.stroke(); // 楕円 ------------------------------------- let oval = UIBezierPath(ovalIn: CGRect(x: 140, y: 190, width: 90, height: 140)) // 塗りつぶし色の設定 UIColor.gray.setFill() // 内側の塗りつぶし oval.fill() // stroke 色の設定 UIColor.green.setStroke() // ライン幅 oval.lineWidth = 2 // 描画 oval.stroke() // 矩形 ------------------------------------- let rectangle = UIBezierPath(rect: CGRect(x: 200,y: 370,width: 120,height: 100)) // stroke 色の設定 UIColor.magenta.setStroke() // ライン幅 rectangle.lineWidth = 8 // 描画 rectangle.stroke() // 角が丸い矩形 ------------------------------------- let roundRect = UIBezierPath(roundedRect: CGRect(x: 50, y: 600, width: 210, height: 70), cornerRadius: 10) // stroke 色の設定 UIColor.yellow.setStroke() roundRect.lineWidth = 6 roundRect.stroke() // 円弧 ------------------------------------- let arc = UIBezierPath(arcCenter: CGPoint(x:180, y:170), radius: 85, startAngle: 0, endAngle: CGFloat(Double.pi)*4/3, clockwise: true) // 透明色設定 let aColor = UIColor(red: 1, green: 1, blue: 0.6, alpha: 0.8) aColor.setStroke() arc.lineWidth = 10 // 点線のパターンをセット let dashPattern:[CGFloat] = [ 1 , 4 ] arc.setLineDash(dashPattern, count: 2, phase: 0) arc.stroke() } } |
背景色をブルーにしました。
References:
iOS UIBezierPath Class Reference
isOpaque – UIView | Apple Developer Documentation