CoreMotion
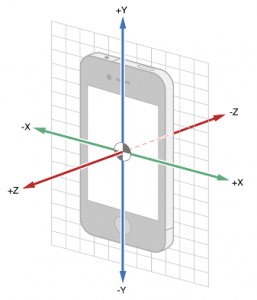
3軸の加速度センサーEvent handling for iOS
によると 上の図のように3軸の加速度センサーが搭載されており、CMAccelerometerData のオブジェクトとしてキャプチャーされています。
ここで気をつけないといけないのは加速度センサーなので加速度を加えたときだけ検知するのではなくそれに重力加速度も加わっているということです。
右に傾けたときは、当然加速度が出ますが、傾いたままでも重力加速度が残っているという事です。細かく言うと地球の自転による遠心力が逆に働いていてその差が重力な訳ですが。昔習ったお話ですねー
加速度センサーの値を取り出す
加速度センサーの値を読み出すコードを実装してみましょう。
CoreMotion の3軸の値を表示するためのラベルを配置します。
ViewController.h
|
1 2 3 4 5 6 7 8 9 10 |
#import <UIKit/UIKit.h> #import <CoreMotion/CoreMotion.h> @interface ViewController : UIViewController @property IBOutlet UILabel *xLabel; @property IBOutlet UILabel *yLabel; @property IBOutlet UILabel *zLabel; @end |
センサー値の取り出し方には2通りあります
|
1 2 3 |
// プル型 // 定期的に値を読みにいく方式 [motionManager startAccelerometerUpdates]; |
|
1 2 3 4 |
// プッシュ型 // ハンドラを設定して、更新情報があると実行される [motionManager startAccelerometerUpdatesToQueue:[NSOperationQueue currentQueue] withHandler:^(CMAccelerometerData *accelerometerData, NSError *error) |
今回はこちらを使います
ViewController.m
|
1 2 3 4 5 6 7 8 9 10 11 12 13 14 15 16 17 18 19 20 21 22 23 24 25 26 27 28 29 30 31 32 33 34 35 36 37 38 39 40 41 42 43 44 45 46 47 |
#import "ViewController.h" @interface ViewController () @end @implementation ViewController{ CMMotionManager *motionManager; } - (void)viewDidLoad { [super viewDidLoad]; // CMMotionManagerのインスタンス生成 motionManager = [[CMMotionManager alloc] init]; [self setupAccelerometer]; } - (void)setupAccelerometer{ if (motionManager.accelerometerAvailable){ // センサーの更新間隔の指定、2Hz motionManager.accelerometerUpdateInterval = 0.5f; // ハンドラを設定 CMAccelerometerHandler handler = ^(CMAccelerometerData *data, NSError *error) { // 加速度センサー double xac = data.acceleration.x; double yac = data.acceleration.y; double zac = data.acceleration.z; // 画面に表示 self.xLabel.text = [NSString stringWithFormat:@"%f", xac]; self.yLabel.text = [NSString stringWithFormat:@"%f", yac]; self.zLabel.text = [NSString stringWithFormat:@"%f", zac]; }; // 加速度の取得開始 [motionManager startAccelerometerUpdatesToQueue:[NSOperationQueue currentQueue] withHandler:handler]; } } @end |
IBのラベルとコードをつなげて
ビルド実行すると
3軸のセンサーデータが読み取れます
実際の生のデータはローパスフィルタなどを使わないと
扱いにくいとは思います。
Swiftのケースはこちらです。
