iPhoneなどスマホでは画面のサイズと縦長という特徴のためリスト表示UIが多用されています。iOSではUITableViewを使って以下のようなリスト表示が可能です。
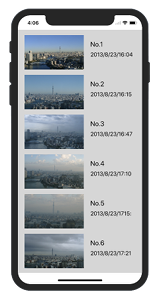
Xcode 9.4
storyboard を使って作る UITableView
リスト形式で要素を順次追加可能でスマホのGUIとして重宝されています。簡単なサンプルを作ってみましょう。
UIImageView と UILabel の配置
最初に簡単なプロジェクト(Single View Application)を作成します。
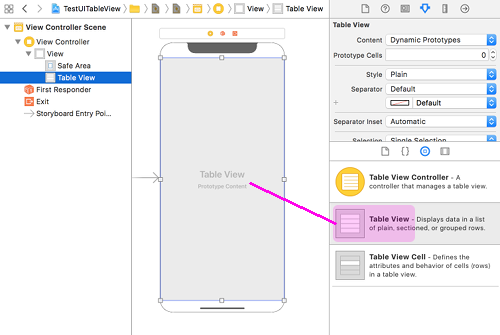
storyboad にて View Controller にTable View を置きます
その上に Table View Cell を追加します
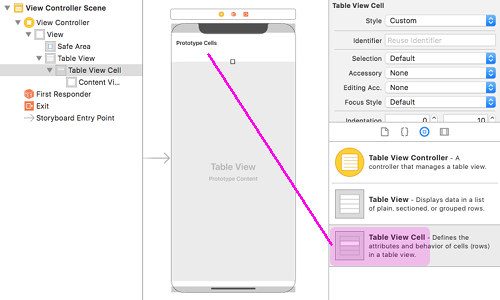
View Controller Scene が
「View」>「Table View」>「Table View Cell」>「Content View」
となるようにします。
そして、その Cell にUIImageView と UILabel を2つ入れます。また見やすくするため、Cell の background を gray にしたり、UIImageViewとLabelのサイズを適宜調整します。
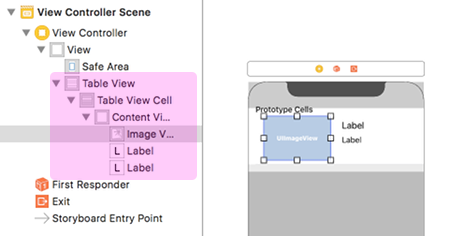
Cell の Identifier や Tag の設定
Table View Cell を選択し、Attributes inspector から
Identifier に名前をつける。(例えば「tableCell」)
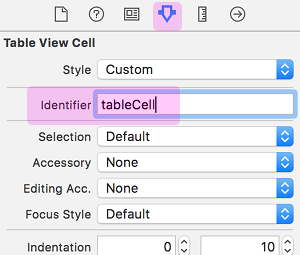
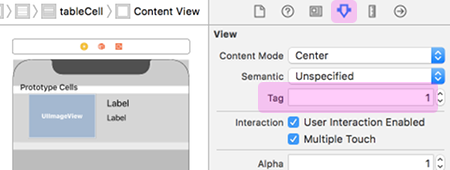
Image View を選択しAttributes inspector で
「View」にある Tag を「1」に設定
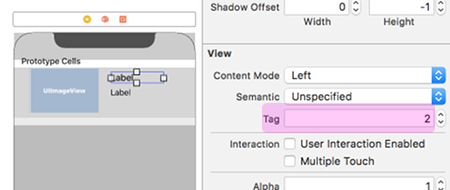
Label を選択
Attributes inspector で
「View」にある Tag を「2」と「3」に設定
コードの記述
UITableViewDelegate, UITableViewDataSource を設定
ViewController.h
|
1 2 3 4 5 6 7 |
#import <UIKit/UIKit.h> @interface ViewController : UIViewController<UITableViewDelegate, UITableViewDataSource> @property IBOutlet UITableView *table; @end |
ViewController.m
|
1 2 3 4 5 6 7 8 9 10 11 12 13 14 15 16 17 18 19 20 21 22 23 24 25 26 27 28 29 30 31 32 33 34 35 36 37 38 39 40 41 42 43 44 45 46 47 48 49 50 51 52 53 54 55 56 57 58 59 60 61 62 63 64 65 66 67 68 69 |
#import "ViewController.h" @interface ViewController () @end @implementation ViewController{ NSArray *imgArray; NSArray *label2Array; UIImageView *imageView; } - (void)viewDidLoad { [super viewDidLoad]; NSLog(@"viewDidLoad"); imgArray = @[@"img0.JPG",@"img1.JPG",@"img2.JPG",@"img3.JPG", @"img4.JPG",@"img5.JPG",@"img6.JPG",@"img7.JPG"]; label2Array = @[@"2013/8/23/16:04",@"2013/8/23/16:15",@"2013/8/23/16:47",@"2013/8/23/17:10", @"2013/8/23/1715:",@"2013/8/23/17:21",@"2013/8/23/17:33",@"2013/8/23/17:41"]; _table.estimatedRowHeight = 50; _table.rowHeight = UITableViewAutomaticDimension; } //Table Viewのセクション数を指定 - (NSInteger)numberOfSectionsInTableView:(UITableView *)tableView { // 今回はセクション1個 return 1; } //Table Viewのセルの数を指定 - (NSInteger)tableView:(UITableView *)tableView numberOfRowsInSection:(NSInteger)section { // 今回は要素8個 return 8; } //各セルの要素を設定する - (UITableViewCell *)tableView:(UITableView *)tableView cellForRowAtIndexPath:(NSIndexPath *)indexPath { static NSString *CellIdentifier = @"tableCell"; // tableCell の ID で UITableViewCell のインスタンスを生成 UITableViewCell *cell = [tableView dequeueReusableCellWithIdentifier:CellIdentifier]; if(cell==nil){ cell = [[UITableViewCell alloc] initWithStyle:UITableViewCellStyleSubtitle reuseIdentifier:CellIdentifier]; } UIImage *img = [UIImage imageNamed:imgArray[indexPath.row]]; // Tag番号 1 で UIImageView インスタンスの生成 imageView = (UIImageView *)[cell viewWithTag:1]; imageView.image = img; // Tag番号 2 で UILabel インスタンスの生成 UILabel *label1 = (UILabel *)[cell viewWithTag:2]; label1.text = [NSString stringWithFormat:@"No.%d",(int)(indexPath.row+1)]; // Tag番号 3 で UILabel インスタンスの生成 UILabel *label2 = (UILabel *)[cell viewWithTag:3]; label2.text = label2Array[indexPath.row]; return cell; } @end |
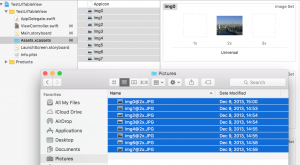
- 画像を8枚プロジェクトに追加し、その名前を配列 NSArray *imgArray とします
- 同じくラベルの情報をそれぞれ配列に入れます
- セクションは1個、要素は8個に設定
- セルの要素を設定では、UIImageView は viewWithTag:1 でインスタンスを生成
- 同じくラベルも設定した Tag に合わせて生成します
ただし、このままだと残念なレイアウトになることがあります。セルの高さを設定してみましょう。
|
1 2 3 4 5 6 |
// セルの高さを設定する - (CGFloat)tableView:(UITableView *)tableView heightForRowAtIndexPath:(NSIndexPath *)indexPath { float height = 120.0f; return height; } |
とりあえず、決め打ちでセルの高さを120.0fにしましたが、画面サイズ、画像サイズに応じて計算したほうがいいでしょう。
storyboard とコードを接続
UITableView を table と結び
detaSource と deleate を view と接続します
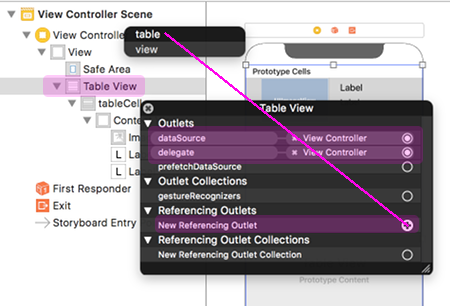
これでビルド実行すると Tabel View が表示されます。
関連ページ:
- TableView作る
- TableViewのセル選択
Reference:
UITableView – UIKit | Apple Developer Documentation