NavigationVIewを使うと簡単に画面遷移が可能です。また画面遷移と同時に値を渡す事もできます。
NavigationView
画面の遷移をさせるためにはいくつかの方法がありますが、NavigationViewはその1つです。
Navigationは画面上部のタブで素早く画面を切り替えるというイメージがありますが、SwiftUIでは柔軟に作成できます。
1. NavigationLink
2. 画面遷移での値渡し
3. NavigationのBar
3.1 navigationTitle
3.2 inline
3.3 ToolbarItem
4. NavigationViewの背景色
4.1 large
4.2 inline
NavigationLink
NavigationLinkを使って画面の遷移先を設定できます。
直接記述してもできますが、Libraryから NavigationView を探して
ContentViewのbodyにドラッグ&ドロップします。
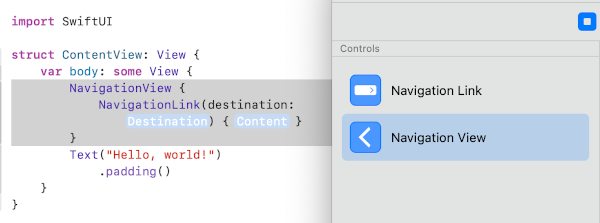
NavigationLink に遷移先の設定、
ContentにはNavigationViewがラップするコンテンツ、ここではTextをそのまま入れておきます。
|
1 2 3 |
NavigationView { NavigationLink(destination: Destination) { Content } } |
例えばこのように遷移先としてSecondViewを作りNavigationLinkのDestinationとします。
Contentとして簡単なテキストを置いて作ります。
ContentView.swift
|
1 2 3 4 5 6 7 8 9 10 11 12 13 14 15 16 17 18 19 20 21 22 23 24 25 26 27 |
import SwiftUI struct ContentView: View { var body: some View { NavigationView { // SecondView()をdestinationとする NavigationLink(destination: SecondView()) { Text("Hello, world!") .padding() } } } } // 新規でViewを作成 struct SecondView: View { var body: some View { Text("SecondView") .padding() } } struct ContentView_Previews: PreviewProvider { static var previews: some View { ContentView() } } |
Preview で実行してみると
Backボタンが自動で追加されています。
Hello, world!のTextがリンクのトリガーになっているのがわかります。
画面遷移での値渡し
画面の遷移先にデータを渡すことができ、structなのでいわゆる値渡しになります。
destinetionで指定した遷移先のプロパティに値を渡すには例えば、
|
1 2 3 |
NavigationLink(destination: SecondView(info: company)){ ... } |
のように遷移先のプロパティに値を渡します。
受け取る遷移先ではTextの文字列として受け取ります。
|
1 2 3 |
let info:String ... Text(info) |
まとめると、
ContentView.swift
|
1 2 3 4 5 6 7 8 9 10 11 12 13 14 15 16 17 18 19 20 21 22 23 24 25 26 27 28 29 30 31 32 33 34 |
import SwiftUI struct ContentView: View { let company = "Apple Inc." var body: some View { NavigationView { NavigationLink(destination: SecondView(info: company)) { Text("Hello, world!") .padding() } } } } struct SecondView: View { let info:String var body: some View { VStack{ Text("SecondView") .padding() Text(info) .font(.largeTitle) .padding() } } } struct ContentView_Previews: PreviewProvider { static var previews: some View { ContentView() } } |
値が渡されているのがわかります。
NavigationのBar
ナビゲーションのバーを設定します。
navigationTitle
iOS14からnavigationTitleを使います。navigationBarTitleは非推奨になりました。
NavigationLinkに
.navigationBarTitle() を追加
|
1 2 3 4 5 6 7 8 9 10 11 12 13 14 15 16 17 18 19 |
struct ContentView: View { var body: some View { NavigationView { NavigationLink(destination: SecondView()) { Text("Hello, world!") .padding() } .navigationTitle("Main Screen") } } } struct SecondView: View { var body: some View { Text("SecondView") .padding() .navigationTitle("Second Screen") } } |
Main Screen と Sub Screen のタイトルが表示されました。
inlineモード
navigationBarTitl は非推奨になったため、inlineモードも使えなのでその代わりに
navigationBarTitleDisplayMode(_:) を使います。
デフォルトでは大きなタイトルで邪魔な時は小さいタイトルにできます。
|
1 |
.navigationBarTitleDisplayMode(.inline) |
モードとしては以下のものがあります。
- large:デフォルト、大きなタイトル文字
- inline:小さなタイトル文字
- automatic:前のNavigationのモードを軽症する
|
1 2 3 4 5 6 7 8 |
NavigationView { NavigationLink(destination: SecondView()) { Text("Hello, world!") .padding() } .navigationTitle("Main Screen") .navigationBarTitleDisplayMode(.inline) } |
Main ScreenがBarTitle内に入り文字サイズが小さくなりました
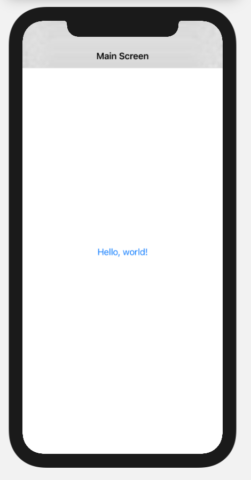
Barを非表示にするにはこの設定を追加します。
|
1 |
.navigationBarHidden(true) |
ToolBarItem
navigationBarItemsは(iOS14から非推奨となりました)
代わりに、toolbarとToolbarItemを使います。
ToolbarItemにButtonやさまざまなItemを設定できます。
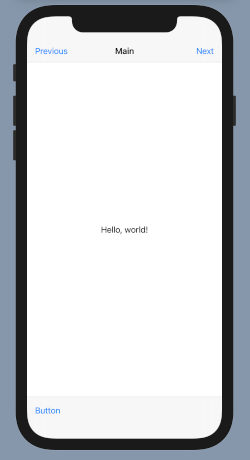
よくあるように3画面をタブで画面遷移させるようにする設定を作ってみます。
ToolbarItemにButtonを置いて画面遷移させる方法もありますが
シンプルNavigationLinkをそのまま使うことも可能です。
|
1 2 3 4 5 6 7 8 9 10 11 12 13 14 15 16 17 18 19 20 21 22 23 24 25 26 27 28 29 30 31 32 33 34 35 36 37 38 39 |
struct ContentView: View { var body: some View { NavigationView { ZStack{ Text("Hello, world!") .padding() } .toolbar { ToolbarItem(placement: .navigationBarLeading) { NavigationLink(destination: PreviousView()){ Text("Previous") } } ToolbarItem(placement: .navigationBarTrailing) { NavigationLink(destination: NextView()){ Text("Next") } } } } } } struct PreviousView: View { var body: some View { VStack{ } .navigationTitle("PreviousView") } } struct NextView: View { var body: some View { VStack{ } .navigationTitle("NextView") } } |
画面上部のタイトルバーにボタンのようにリンクを置きましたが、ToolbarItemにはさまざまな機能があり、画面下部にボタンを配置することもできます。
|
1 2 3 4 5 |
ToolbarItem(placement: .bottomBar) { Button(action: {}, label:{ Text("Button") }) } |
NavigationViewの背景色
NavigationView の背景の色を設定したい場合は、Titleの大きさでやり方が多少ことなります。
large Titile
デフォルトのlargeが設定されている場合です。
ZStackをNavigationView以下に置き
Color.yellow.edgesIgnoringSafeArea( .all)を使います。
|
1 2 3 4 5 6 7 8 9 10 |
NavigationView { ZStack{ Color.yellow.edgesIgnoringSafeArea( .all) NavigationLink(destination: SecondView()) { Text("Hello, world!") .padding() } } .navigationTitle("Main Screen") } |
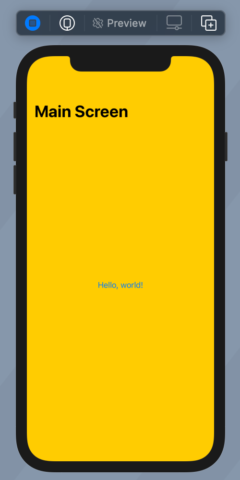
NavigationBarのみの背景色の設定には今のところ以下のような方法になってしまいます。いずれSwiftUIで直接できるようになるかもしれません。
尚、このUINavigationBarはinlineでは機能しないです。
|
1 2 3 4 |
init(){ UINavigationBar.appearance().backgroundColor = UIColor.green UIToolbar.appearance().barTintColor = UIColor.blue } |
全画面に配色して、SafeAreaに別の色領域にすると擬似的にタイトル領域の背景を設定できるかなと思います。
ContentView.swift
|
1 2 3 4 5 6 7 8 9 10 11 12 13 14 15 16 17 18 19 20 21 22 23 24 25 26 27 28 29 30 31 32 33 34 35 36 37 38 39 40 41 |
import SwiftUI struct ContentView: View { let colorM1: Color = Color(red:0.6, green:0.5, blue:0.9, opacity: 0.3) let colorM2: Color = Color(red:0.6, green:0.5, blue:0.9, opacity: 0.7) var body: some View { NavigationView { ZStack{ colorM1.edgesIgnoringSafeArea( .all) Rectangle().fill(colorM2) NavigationLink(destination: SecondView()) { Text("Hello, world!") .padding() } } .navigationTitle("Main Screen") } } } struct SecondView: View { let colorS1: Color = Color(red:0.9, green:0.5, blue:0.6, opacity: 0.3) let colorS2: Color = Color(red:1.0, green:0.4, blue:0.7, opacity: 0.5) var body: some View { ZStack{ Text("SecondView") .padding() .navigationTitle("Second Screen") colorS1.edgesIgnoringSafeArea( .all) Rectangle().fill(colorS2) } } } struct ContentView_Previews: PreviewProvider { static var previews: some View { ContentView() } } |
背景色を固定色ではなくRGBで調整してみました。
ZStackの背景色を別の方法でも設定できます。
|
1 2 3 4 5 6 |
ZStack{ ... } .frame(maxWidth: .infinity, maxHeight: .infinity, alignment: .center) .background(colorM2) .background(colorM1.edgesIgnoringSafeArea( .all)) |
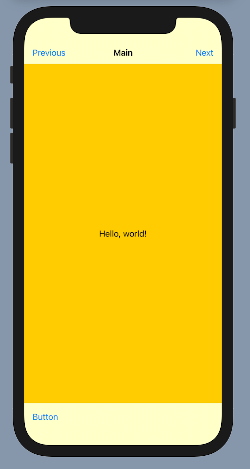
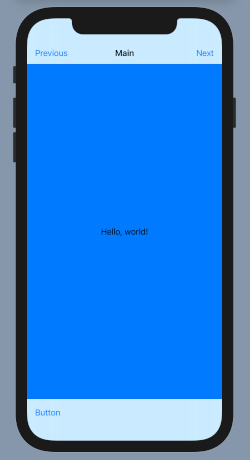
inline Titile
inlineの場合は上部のバーはこれまでの設定が簡単に使えません。
ただし、それなりに自動的に設定されるようです。
メイン画面が白の場合、薄いグレー色になっています。
背景が黄色
背景が青
背景が緑
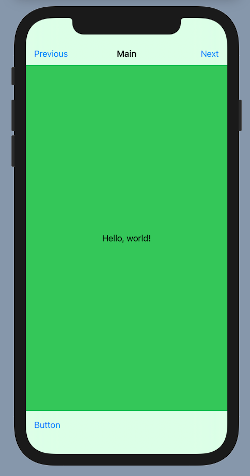
下のバーはUIToolbarで背景色を設定できますが、これでもそれなりにいい感じにしてくれるので良いのかもしません
References:
NavigationView | Apple Developer Documentation
NavigationLink – SwiftUI | Apple Developer Documentation
navigationTitle(_:) | Apple Developer Documentation
toolbar(content:) | Apple Developer Documentation
ToolbarItem | Apple Developer Documentation
(非推奨)
navigationBarTitle(_:) | Apple Developer Documentation
navigationBarItems(leading:trailing:) | Apple Developer