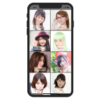
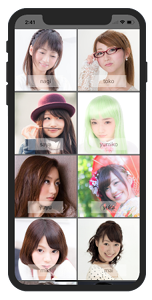
UICollectionView を使うと格子状、Gridの表示ができます。使い方は UITableView に似ています。Cell内の要素をTagで識別する方法で作ってみます。
Xcode 9.4
UICollectionView
UICollectionView の設定は UITableView と似ているので、これを理解できればUITableViewも作りやすくなります。
また、セルのためのクラスを作成する方法もありますが、ここではTagを使った簡単な方法を採用しました。
1.storyboard に Collection View を設定
2.画像の設定
3.ViewController にコードを記述
4.ViewController と CollectionView の紐付け
5.Cellの調整
storyboard に Collection View を設定
Collection View の配置
storyboard のView Controller上に Collection View を配置します。
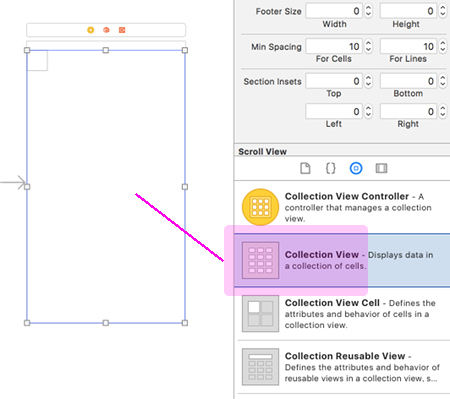
特別なレイアウトを想定していないのであれば、Collection View はSafe Area (iPhone Xという変なものが出たので) に入れておいた方が分かりやすいです。
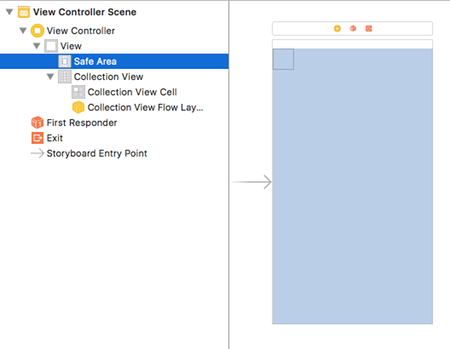
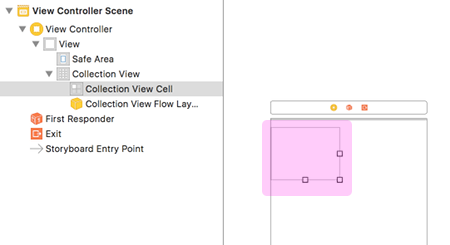
Collection View Cell 確認
基本的にはCollection View Cell が既にできています。「Collection View Cell」を選択してサイズをmanualで変更することもできます。
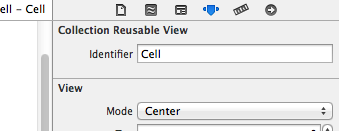
Cell の ID設定
Collection Reusable Viewの Identifier を、例えば「Cell」と設定します。
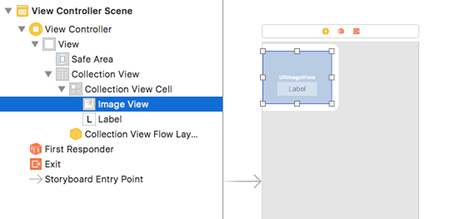
UIImageViewとUILabelの配置
この Cell の中に、UIImageView と Label を置きます。
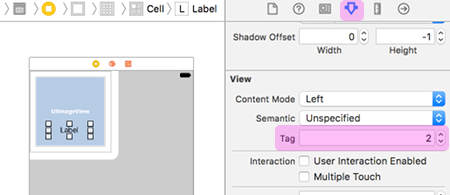
Tagの設定
UIImageView の View にある Tag を「1」
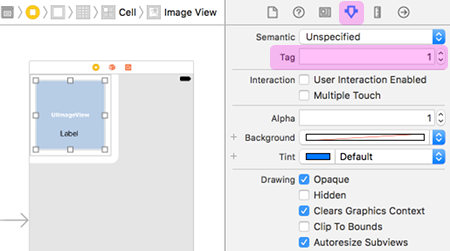
Label の Tag を「2」とセットします。
画像の設定
サムネイル画像を集めて、名前に@2xを追加したファイルにして、Assets.xcassets に配置します。@3xファイルも作成したいところですが、サムネイルなので大丈夫でしょう。

ちなみに、ここで使ったファイルは全て正方形ですが、エンコード(jpg,png…)も画面サイズも異なるものです。
ViewController にコードを記述
以下コードを記述していきます。
UICollectionViewDataSource, UICollectionViewDelegate を設定
ViewController.h
|
1 2 3 4 5 6 7 |
#import <UIKit/UIKit.h> @interface ViewController : UIViewController<UICollectionViewDataSource, UICollectionViewDelegate> @property IBOutlet UICollectionView *collectionView; @end |
ViewController.m
|
1 2 3 4 5 6 7 8 9 10 11 12 13 14 15 16 17 18 19 20 21 22 23 24 25 26 27 28 29 30 31 32 33 34 35 36 37 38 39 40 41 42 43 44 45 46 47 48 49 50 51 52 53 54 55 56 57 58 59 |
#import "ViewController.h" @interface ViewController (){ NSArray *photos; } @end @implementation ViewController - (void)viewDidLoad { [super viewDidLoad]; // 配列要素 photos = @[@"nagi", @"toko", @"saya", @"yumiko", @"yuyu", @"yuka", @"miki", @"mai",@"kurumi", @"katakuriko"]; } - (NSInteger)numberOfSectionsInCollectionView:(UICollectionView *)collectionView { //section 数の設定、今回は1つにセット return 1; } -(NSInteger)collectionView:(UICollectionView *)collectionView numberOfItemsInSection:(NSInteger)section{ // itemの数を設定する、配列の全要素数を入れる return photos.count; } -(UICollectionViewCell *)collectionView:(UICollectionView *)collectionView cellForItemAtIndexPath:(NSIndexPath *)indexPath{ UICollectionViewCell *cell; //dequeueReusableCellWithReuseIdentifier の働きは再利用できるセルがあればそれを使う // 再利用できるセルがなければ生成する cell = [collectionView dequeueReusableCellWithReuseIdentifier:@"Cell" forIndexPath:indexPath]; //storyboard上の画像につけたタグに合わせて UIImageView のインスタンスを生成 UIImageView *imageView = (UIImageView *)[cell viewWithTag:1]; // 配列のindexをcellのindexと同じにする NSString *imgName = photos[(int)(indexPath.row)]; // 配列の名前の画像を呼び出す UIImage *image = [UIImage imageNamed:imgName]; // UIImageをimageViewの画像として設定 imageView.image = image; UILabel *label = (UILabel *)[cell viewWithTag:2]; label.text = photos[(int)(indexPath.row)]; return cell; } - (void)didReceiveMemoryWarning { [super didReceiveMemoryWarning]; // Dispose of any resources that can be recreated. } @end |
ViewController と CollectionView の紐付け
storyboard に戻ってCollection View を選択
dataSource -> View Controller
delegate -> View Controller
New Referencing Outlet -> collectionView
とそれぞれ紐付けします。

ビルドして実行するとCollectionViewが表示されました。
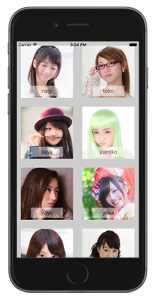
とりあえず表示はされていますが、イマイチな感じですね、セルのサイズがスクリーンと合っていません
Cellの調整
画面サイズに合ったセルサイズを計算して合わせこみをします。
|
1 2 3 4 5 6 7 8 9 10 11 12 13 14 15 |
- (CGSize)collectionView:(UICollectionView *)collectionView layout:(UICollectionViewLayout*)collectionViewLayout sizeForItemAtIndexPath:(NSIndexPath *)indexPath { int screenWidth = self.view.frame.size.width; // 2列、セル横スペース CGFloat cellframe = screenWidth/2-2; return CGSizeMake(cellframe, cellframe); } - (CGFloat)collectionView:(UICollectionView *)collectionView layout:(UICollectionViewLayout*)collectionViewLayout minimumLineSpacingForSectionAtIndex:(NSInteger)section{ // セル縦スペース return 4; } |
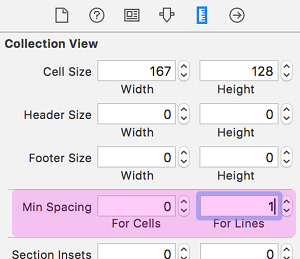
Min Spacing:
またCellの幅が2列可能な大きさなのに1列で表示されているケースなどでは、CollectionView設定にあるFor Cells と For Lines の「Min Spacing」が大きすぎるようであれば調整してください。
AutoResizing:
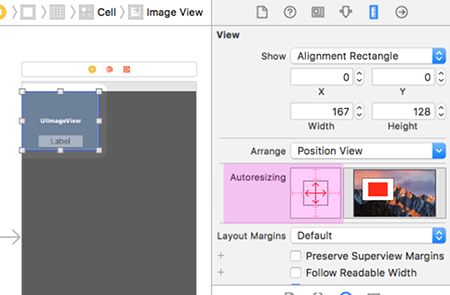
古いやり方ですがこういうのもあると言うことです。UIImageViewのAutoResizingの設定を図のようにします。これによりCellが矩形で横いっぱいになったサイズに合わせることができます。またUILabelも同様の設定をしておきます。
意外とこれでいい具合にできるかもしれません
背景を適当にGrayにしてビルド実行しました。
iPhone Xでもsimulatorで実行してみました。(storyboardのCollection Viewの範囲をiPhone Xで確認した方がいいかもしれません)
Swiftのケースはこちらです。
Reference:
UICollectionView – UIKit | Apple Developer Documentation
