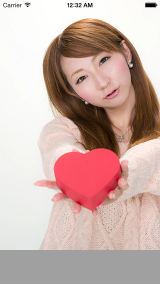
CALayerを使うと画像のぼかしやモザイクを作ることができます。
Xcode 9.4
CALayer
CALayer の CA は Core Animationのことでアニメーションの画像処理系の重い処理に適しています。またUIViewと被っているような気もするのですが、その差は
CALayer
‘The CALayer class manages image-based content and allows you to perform animations on that content.’
アニメーション的な事はこちらが使いやすいということのようです
UIView
‘The UIView class defines a rectangular area on the screen and the interfaces for managing the content in that area.’
描画する領域について色々定義しているということでしょうか
画像をぼかし、モザイク化
まず、ラスタライズ化を設定します。これはベクター形式などの画像データをBMPのようなピクセル、ドットに置き換えることです。
imageView.layer.shouldRasterize = YES;
ラスタライズのスケールを設定します。
imageView.layer.rasterizationScale = 0.1;
これで、それなりの画像のぼけを出せます。
|
1 2 3 4 5 6 7 |
UIImage *image = [UIImage imageNamed:@"sample.png"]; UIImageView *imageView = [[UIImageView alloc] initWithImage:image]; imageView.layer.shouldRasterize = YES; imageView.layer.rasterizationScale = 0.1; [self.view addSubview:imageView]; |
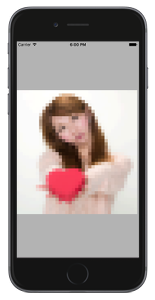
結果は

これは画像を縮小したものを拡大したらできるようです
実際にオーソドックスに画像を1/10にしてから10倍に拡大して見ました。
|
1 2 3 4 5 6 7 8 9 10 11 12 13 14 15 16 17 18 19 20 21 22 23 24 25 26 27 28 |
// 元画像 image1 UIImage *image1 = [UIImage imageNamed:@"toko_6.png"]; // 元画像の高さ、幅を取得 CGFloat width = image1.size.width; CGFloat height = image1.size.height; // スケーリング`10% CGFloat scale = 0.1f; CGFloat sWidth = width*scale; CGFloat sHeight = height*scale; UIGraphicsBeginImageContext(CGSizeMake(sWidth, sHeight)); // 元画像を10%に縮小 [image1 drawInRect:CGRectMake(0, 0, sWidth, sHeight)]; // 縮小画像した画像を image2 とする UIImage *image2 = UIGraphicsGetImageFromCurrentImageContext(); UIGraphicsEndImageContext(); // 元画像サイズで枠を作成 UIGraphicsBeginImageContext(CGSizeMake(width, height)); // 縮小画像を元画像サイズに拡大 [image2 drawInRect:CGRectMake(0, 0, width, height)]; // 拡大した画像を image3 とする UIImage *image3 = UIGraphicsGetImageFromCurrentImageContext(); UIGraphicsEndImageContext(); UIImageView *imageView = [[UIImageView alloc] initWithImage:image3]; [self.view addSubview:imageView]; |
サンプリングが異なっているのかもしれませんが、
ぼけたモザイクっぽくなりました。
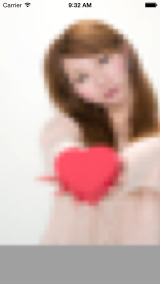
コード量は圧倒的に多いですが。
元にもどって、先ほどの画像は粗いので、これをローパスフィルターをかけるとぼやけた感がでてきます。スケーリングフィルターには3種類あり
- kCAFilterLinear (default)
- いわゆる線形補間で2点間を結んだ線上に中間データを想定する
- kCAFilterNearest
- 近傍補間は、近傍の4点の元データから目的のデータを計算する
- kCAFilterTrilinear
- トリ・リニア補間は近傍補間に更にミニマップを追加した8点補間
この kCAFilterTrilinear を minificationFilter に追加すると
imageView.layer.minificationFilter = kCAFilterTrilinear;

となります。
先ほどのラスタライズのスケールを変更するとぼやけ感が変わります。
mageView.layer.rasterizationScale = 0.2;

また拡大する時の magnificationFilter に kCAFilterNearest を追加すると
imageView.layer.magnificationFilter= kCAFilterNearest;

モザイクになりました。
コードは下のようになります。
QuartzCore.framewark の追加を忘れずに
ViewController.m
|
1 2 3 4 5 6 7 8 9 10 11 12 13 14 15 16 17 18 |
- (void)viewDidLoad { [super viewDidLoad]; UIImage *image = [UIImage imageNamed:@"sample.png"]; UIImageView *imageView = [[UIImageView alloc] initWithImage:image]; // ラスタライズ化する imageView.layer.shouldRasterize = YES; // スケールファクター imageView.layer.rasterizationScale = 0.1; // 縮小フィルタをトリ・リニア imageView.layer.minificationFilter = kCAFilterTrilinear; // 拡大フィルターを近傍補間 imageView.layer.magnificationFilter= kCAFilterNearest; [self.view addSubview:imageView]; } |
アニメーションにする
モザイク画からフェードインするような演出を作ります。
rasterizationScale をキーにして CABasicAnimation のインスタンスを生成
duration でアニメーション期間を設定して、その間の開始と終了時のキー値を入れます。
imageView.layer に追加する
コードは以下のようになります。
ViewController.m
|
1 2 3 4 5 6 7 8 9 10 11 12 13 14 15 16 17 18 19 20 21 22 23 24 25 26 27 28 29 30 31 32 33 34 35 36 37 38 39 40 41 42 43 44 45 46 47 48 49 50 51 52 53 54 55 56 57 58 59 60 61 62 63 |
#import "ViewController.h" #import <QuartzCore/QuartzCore.h> @interface ViewController () @end @implementation ViewController - (void)viewDidLoad { [super viewDidLoad]; UIImage *image = [UIImage imageNamed:@"sample.png"]; UIImageView *imageView = [[UIImageView alloc] initWithImage:image]; // スクリーン横幅一杯に拡大・縮小率の計算 CGFloat width = image.size.width; CGFloat height = image.size.height; CGFloat screenWidth = self.view.frame.size.width; CGFloat scale = screenWidth/width; // 画像サイズ変更 CGRect rect = CGRectMake(0, 150, width*scale, height*scale); // ImageView frame をCGRectMakeで作った矩形に合わせる imageView.frame = rect; imageView.layer.shouldRasterize = YES; imageView.layer.rasterizationScale = 0.1; imageView.layer.minificationFilter = kCAFilterTrilinear; imageView.layer.magnificationFilter= kCAFilterNearest; CABasicAnimation *testAnimation = [CABasicAnimation animationWithKeyPath:@"rasterizationScale"]; // rasterizationScale を 0.01からスタート testAnimation.fromValue = [NSNumber numberWithFloat:0.01]; // 1.0 まで変化させる testAnimation.toValue = [NSNumber numberWithFloat:1.0]; // 全期間は5秒間 testAnimation.duration = 5.0; // このアニメーション結果を残す testAnimation.removedOnCompletion = NO; testAnimation.fillMode = kCAFillModeForwards; [imageView.layer addAnimation:testAnimation forKey:@"testAnimation"]; [self.view addSubview:imageView]; } - (void)didReceiveMemoryWarning { [super didReceiveMemoryWarning]; // Dispose of any resources that can be recreated. } @end |
アニメーション5秒…
お疲れさまでした
Swiftでは


Reference:
CABasicAnimation – Core Animation | Apple Developer Documentation