UIImageView は画像を扱うクラスですが、簡単にパラパラ漫画的なアニメーションもできます。

Xcode 9.4
UIImageView でぱらぱらアニメ
本格的なアニメーションは別のAPIを使うほうがいいのですが、手軽に簡単にやりたい場合はUIImageViewの機能を使うこともできます。
ぱらぱらアニメの手順
一枚一枚の画像を一定間隔で表示させてパラパラ漫画的に動画のように見えるようにする方法です。手順としてはUIImageのArrayを作り、それに画像を一つづつ割り当てます。
- アニメーション用の UIImage を複数用意
- UIImage の配列を NSArray で作る
- UIImageView のインスタンス生成
- view に追加する
- 画像の配列をアニメーションにセット
- 1枚あたりの時間間隔を設定
- 繰り返し回数をセット
|
1 2 3 4 5 6 |
// アニメーション用の画像 UIImage *image1 = [UIImage imageNamed:@"img_1"]; UIImage *image2 = [UIImage imageNamed:@"img_2"]; // 配列を作る NSArray *imageList = [NSArray arrayWithObjects:image1, image2, nil]; |
UIImageViewのインスタンスを生成して、animationImagesメソッドを使ってUIImage のNSArrayを設定していきます。
|
1 2 3 4 5 6 7 8 9 10 11 12 13 14 15 16 17 |
// UIImageView のインスタンス生成 imageView = [[UIImageView alloc]initWithFrame:rect]; ... // 画像の配列をアニメーションにセット imageView.animationImages = imageList; // 1.5秒間隔 imageView.animationDuration = 1.5f; // 3回繰り返し imageView.animationRepeatCount = 3; // アニメーションを開始 [imageView startAnimating]; // アニメーションを終了 [imageView stopAnimating]; |
サンプルコード
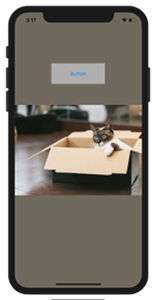
このアニメーションを起動するためのボタンをストーリーボードで設定して、背景色を変更します。
ViewController.m
|
1 2 3 4 5 6 7 8 9 10 11 12 13 14 15 16 17 18 19 20 21 22 23 24 25 26 27 28 29 30 31 32 33 34 35 36 37 38 39 40 41 42 43 44 45 46 47 48 49 50 51 52 53 54 55 56 57 58 59 60 61 62 63 64 65 66 67 68 |
#import "ViewController.h" @interface ViewController (){ UIImageView *imageView; } @end @implementation ViewController - (void)viewDidLoad { [super viewDidLoad]; [self initImageView]; } - (void)initImageView { // 背景色の設定 UIColor *customColor = [UIColor colorWithRed:0.44 green:0.41 blue:0.36 alpha:1.0]; self.view.backgroundColor = customColor; // アニメーション用の画像 UIImage *image1 = [UIImage imageNamed:@"cat_1"]; UIImage *image2 = [UIImage imageNamed:@"cat_2"]; UIImage *image3 = [UIImage imageNamed:@"cat_3"]; UIImage *image4 = [UIImage imageNamed:@"cat_4"]; // 配列を作る NSArray *imageList = [NSArray arrayWithObjects:image1, image2, image3, image4, nil]; // 画像が画面中央にくるように位置合わせ CGFloat pWidth = [UIScreen mainScreen].bounds.size.width; CGFloat pHeight = [UIScreen mainScreen].bounds.size.height; // 画像の横幅サイズはスクリーンに合わせてあります CGFloat imgW = image1.size.width; CGFloat imgH = image1.size.height; CGFloat x0 = (pWidth - imgW)/2; CGFloat y0 = (pHeight - imgH)/2; CGRect rect = CGRectMake(x0, y0, imgW, imgH); // UIImageView のインスタンス生成 imageView = [[UIImageView alloc]initWithFrame:rect]; imageView.image = image1; [self.view addSubview:imageView]; // 画像の配列をアニメーションにセット imageView.animationImages = imageList; // 1.5秒間隔 imageView.animationDuration = 1.5f; // 3回繰り返し imageView.animationRepeatCount = 3; // アニメーションを終了 // [imageView stopAnimating]; } // ボタンタップ - (IBAction)buttonTapped { // アニメーションを開始 [imageView startAnimating]; } @end |
storyboardの設定
@2xのRetina対応にした画像 cat_1@2x.jpg, cat_2@2x.jpg,…
これらを Assets.xcassets に入れます。

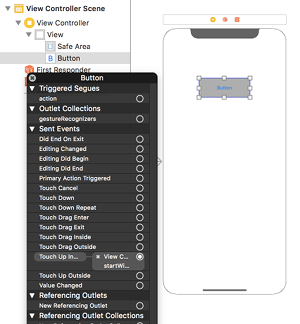
storyboardにボタンを置き、 背景色など適当に入れてボタンアクションの
start(sender: AnyObject)
と「Touch up Inside」で紐付けします。

サンプル動画
ボタンをタップするとパラパラ漫画となりました。
尚、Swift のケースはこちらです
Reference:
animationImages – UIImageView | Apple Developer Documentation