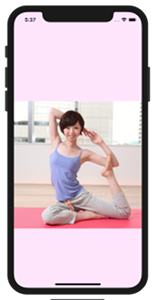
写真アプリでは1画面に写真1枚の表示で、スワイプさせて次の写真を閲覧できますが、そのような機能を実現させるにはUIScrollViewを使うと可能です。

Xcode 9.3
UIScrollView
ページ毎に画像がスクロールさせるためPaging Enableを設定するところがポイントになります。
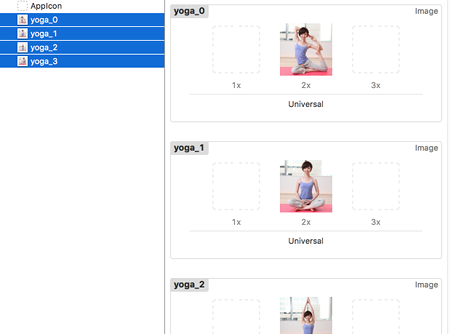
画像をAssets.xcassetsに追加
例としてヨガのポーズ画像を使いますがその画像ファイル、yoga_0@2x.jpg から yoga_3@2x.jpg までをAssets.xcassetsにコピペします。@2xを名前に入れてあるので2xとして設定されています。

UIScrollViewの設定
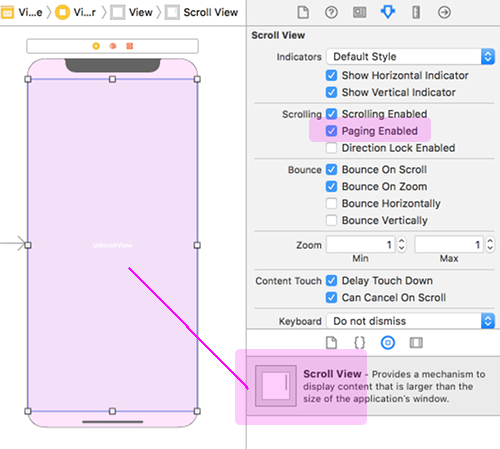
Storyboard を開き背景色を適当に決めます。Scroll View を選択してSafeAreaあたりに設置します。

ここでScroll View の Paging Enabled にチェックを入れることにより、ページスクロールが可能となります。
コードの記述
- UIScrollView のインスタンスを生成
- 画像ごとにそのframeサイズを設定し
- addSubview でUIScrollViewに加える
- 描画開始のカーソルポイントを決め
- UIScrollViewのコンテンツサイズを画像のtotalサイズに合わせる
ViewController.m
|
1 2 3 4 5 6 7 8 9 10 11 12 13 14 15 16 17 18 19 20 21 22 23 24 25 26 27 28 29 30 31 32 33 34 35 36 37 38 39 40 41 42 43 44 45 46 47 48 49 50 51 52 53 54 55 56 57 58 59 60 61 62 63 64 65 66 67 68 69 70 71 72 73 74 75 76 77 78 79 80 81 82 83 |
#import "ViewController.h" @implementation ViewController{ // UIScrollView のインスタンス IBOutlet UIScrollView *scrollView; } // ページの幅 CGFloat pWidth; // 表示画像の高さ CGFloat rectHeight; // Totalのページ数 const NSUInteger pNum = 4; // 画像のframeサイズ取得とScrollViewへ追加 - (void)viewDidLoad { [super viewDidLoad]; pWidth = [UIScreen mainScreen].bounds.size.width; NSString *imgNameTop = [NSString stringWithFormat:@"yoga_0.jpg"]; UIImage *imgTop = [UIImage imageNamed:imgNameTop]; // 表示領域の設定 CGFloat imgWidth = imgTop.size.width; CGFloat imgHeight = imgTop.size.height; rectHeight = pWidth * imgHeight/imgWidth; for (int i=0; i < pNum; i++){ // UIImageViewのインスタンス NSString *imageName = [NSString stringWithFormat:@"yoga_%d.jpg", i]; UIImage *image = [UIImage imageNamed:imageName]; UIImageView *imageView = [[UIImageView alloc] initWithImage:image]; CGRect rect = imageView.frame; rect.size.height = rectHeight; rect.size.width = pWidth; imageView.frame = rect; imageView.tag = i+1; // UIScrollViewのインスタンスに画像を貼付ける [scrollView addSubview:imageView]; } [self setupScrollImages]; } //ScrollViewの設定 - (void)setupScrollImages{ UIImageView *view = nil; NSArray *subviews = [scrollView subviews]; // 描画開始の x,y 位置 CGFloat px = 0; CGFloat py = (self.view.frame.size.height - rectHeight)/2; for (view in subviews) { NSLog(@"tag = %ld",(long)view.tag); if ([view isKindOfClass:[UIImageView class]] && view.tag > 0) { CGRect frame = view.frame; frame.origin = CGPointMake(px, py); view.frame = frame; px += (pWidth); } } // UIScrollViewのコンテンツサイズを画像のtotalサイズに合わせる [scrollView setContentSize:CGSizeMake( pWidth * pNum, rectHeight)]; } - (void)didReceiveMemoryWarning { [super didReceiveMemoryWarning]; // Dispose of any resources that can be recreated. } @end |
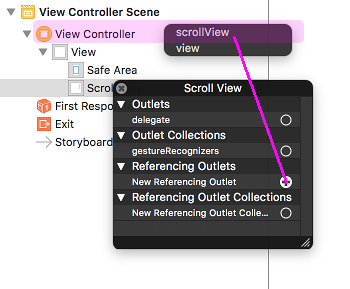
Storyboard の ScrollView の 「New Reference Outlet」 をコードと紐付けします。
これで、横スクロールで次々と画像が表示されていきます。

サンプル動画
Swiftでは以下を参考にしてください。
References:
UIScrollView – UIKit | Apple Developer Documentation
isPagingEnabled – UIScrollView | Apple Developer Documentation
About Scroll View Programming – Apple Developer
pagingEnabled – UIScrollView | Apple Developer Documentation(Objective-C)
