色々な制約があって、Storyboard を使わずにラベルを貼ったり、ボタンを設定することがあります
画面遷移をコードだけで実行させるにはどうするか試してみました。
Objective-C
Xcode 9.3.1
Xcode 9.3.1
presentViewController
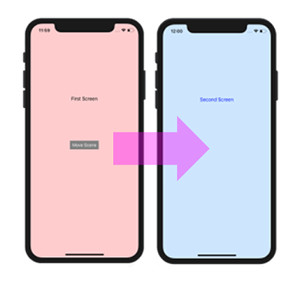
遷移先の SecondViewControlle のインスタンスを生成して、presentViewControllerで遷移させます。
これはStoryboardを使った時の選択肢の1つであるPresent modallyに相当し、
「現在のviewの上に覆いかぶさるように新しいviewを表示」させる画面遷移となります。
SwiftでSegueを使った例:
アプリでA画面からB画面に遷移したいケースは結構あります。コードで記述せざる得ない場合もありますが、StoryboardでSceneを作って...

2020-03-31 12:38
|
1 2 |
SecondViewController *secondVC = [[SecondViewController alloc] init]; [self presentViewController: secondVC animated:YES completion: nil]; |
ラベルやボタンも全て
Storyboard は一切使わずに
コードで記述したケースです
ViewController.m
|
1 2 3 4 5 6 7 8 9 10 11 12 13 14 15 16 17 18 19 20 21 22 23 24 25 26 27 28 29 30 31 32 33 34 35 36 37 38 39 40 41 42 43 44 45 46 47 |
#import "ViewController.h" #import "SecondViewController.h" @interface ViewController () @end @implementation ViewController - (void)viewDidLoad { [super viewDidLoad]; UIColor *customColor = [UIColor colorWithRed:1.0 green:0.8 blue:0.8 alpha:1.0]; self.view.backgroundColor = customColor; UILabel *firstLabel = [[UILabel alloc] init]; int screenWidth = self.view.frame.size.width; int screenHeight = self.view.frame.size.height; firstLabel.frame = CGRectMake((screenWidth/2 - 150/2), 250, 150, 20); firstLabel.text = @"First Screen"; firstLabel.textAlignment = NSTextAlignmentCenter; [self.view addSubview:firstLabel]; UIButton *button = [UIButton buttonWithType:UIButtonTypeRoundedRect]; button.frame = CGRectMake((screenWidth/2 -50), screenHeight/2, 100, 30); button.backgroundColor = [UIColor grayColor]; [button setTitleColor:[UIColor whiteColor] forState:UIControlStateNormal]; [button setTitle:@"Move Scene" forState:UIControlStateNormal]; [button addTarget:self action:@selector(moveButton:)forControlEvents:UIControlEventTouchDown]; [self.view addSubview:button]; } -(void)moveButton:(UIButton*)button{ SecondViewController *secondVC = [[SecondViewController alloc] init]; [self presentViewController: secondVC animated:YES completion: nil]; } - (void)didReceiveMemoryWarning { [super didReceiveMemoryWarning]; // Dispose of any resources that can be recreated. } @end |
遷移先
SecondViewController.m
|
1 2 3 4 5 6 7 8 9 10 11 12 13 14 15 16 17 18 19 20 21 22 23 24 25 26 27 28 29 30 31 32 33 34 35 36 37 38 39 40 41 42 |
#import "SecondViewController.h" @interface SecondViewController () @end @implementation SecondViewController - (id)initWithNibName:(NSString *)nibNameOrNil bundle:(NSBundle *)nibBundleOrNil { self = [super initWithNibName:nibNameOrNil bundle:nibBundleOrNil]; if (self) { } return self; } - (void)loadView { [super loadView]; UIColor *customColor = [UIColor colorWithRed:0.8 green:0.9 blue:1.0 alpha:1.0]; self.view.backgroundColor = customColor; } - (void)viewDidLoad { [super viewDidLoad]; UILabel *secondLabel = [[UILabel alloc] init]; int screenWidth = self.view.frame.size.width; secondLabel.frame = CGRectMake((screenWidth/2 - 150/2), 250, 150, 20); secondLabel.text = @"Second Screen"; secondLabel.textAlignment = NSTextAlignmentCenter; secondLabel.textColor = [UIColor blueColor]; [self.view addSubview:secondLabel]; } - (void)didReceiveMemoryWarning { [super didReceiveMemoryWarning]; // Dispose of any resources that can be recreated. } @end |
ヘッダーファイルはそのままです。
Ref: presentViewController:animated:completion: – UIViewController …