HStackを使ってレイアウトをする上で、alignmet、spacing、backgroundの背景色等はどのように設定するのか確認してみます。
HStack
HStackなどStackには他にVStack、ZSTackやLazyVStack、LazyHStackがありました。
ここでは特にHStackについて細かく設定を確認します。
1. alignment
1.1 top
1.2 center
1.3 bottom
1.4 firstTextBaseline
1.5 lastTextBaseline
2. spacing
3. Spacer()
4. background
5. frame
6. Divider
alignment
alignment は垂直方向に上・中央・下に寄せるベースラインを揃える操作になります。
- top :上寄せ
- center:中央
- bottom:下寄せ
- firstTextBaseline:第一行のベースラインを揃える
- lastTextBaseline:最終行のベースラインを揃える
top
|
1 2 3 4 5 6 7 |
// .top :上寄せ HStack(alignment: .top){ Text("HStack") .padding() Text("Unlike LazyHStack, which only renders the views when your app needs to display them onscreen, an HStack renders the views all at once, regardless of whether they are on- or offscreen. Use the regular HStack when you have a small number of child views or don’t want the delayed rendering behavior of the “lazy” version.") .padding() } |
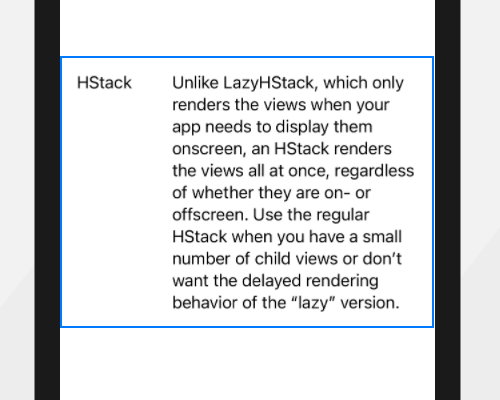
1行の文字列では垂直方向の位置がわかりにくいので片方の文字を多くして行数を増やしました。HStackの文字列が上寄せになったのがわかります。
(青い矩形枠はStackを選択した場合に領域を表示してくれるもので、実際は枠はありません。またpadding()が追加されているのでそのまま使っていますが外す事も可能です。)
center
|
1 2 3 4 |
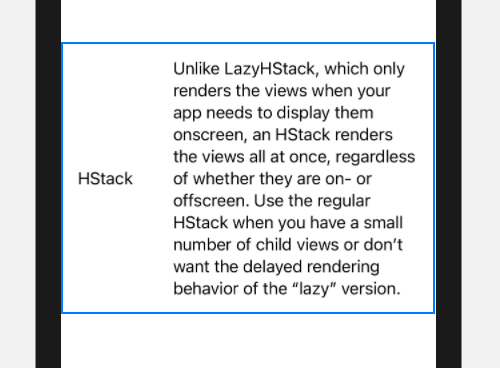
// .center:中央 HStack(alignment: .center) { ... } |
bottom
|
1 2 3 4 |
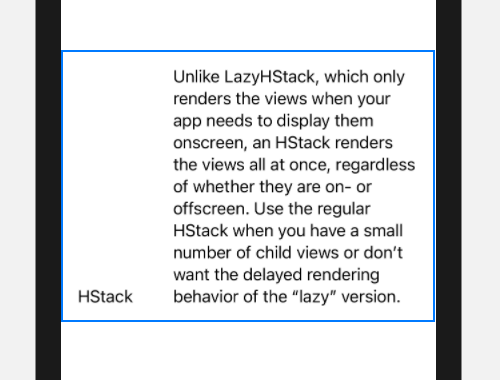
// .bottom:下寄せ HStack(alignment: .bottom) { ... } |
firstTextBaseline
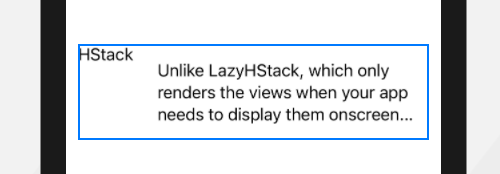
firstTextBaseline は top との違いがわかりにくいのですが、例えばpadding()を外して比較するとわかります。
|
1 2 3 4 5 6 7 |
// 片方のpadding()を外す HStack(alignment: .top){ Text("HStack") // .padding() Text("Unlike LazyHStack, which only renders the views when your app needs to display them onscreen...") .padding() } |
padding()による上下左右の余白が無くなるとtopでは余白分揃わなくなります。
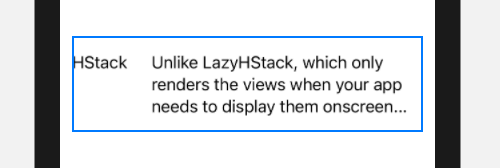
firstTextBaselineに変更、
|
1 2 3 4 5 6 7 |
// .firstTextBaseline:第一行のベースラインを揃える HStack(alignment: .firstTextBaseline){ Text("HStack") // .padding() Text("Unlike LazyHStack, which only renders the views when your app needs to display them onscreen...") .padding() } |
ベースラインが揃っているのがわかります。
lastTextBaseline
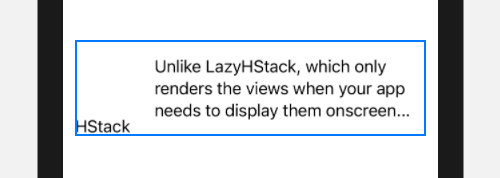
firstTextBaselineと同様にpadding()を外すと余白分のズレが発生します。
|
1 2 3 4 5 6 7 |
// 片方のpadding()を外す HStack(alignment: .bottom){ Text("HStack") // .padding() Text("Unlike LazyHStack, which only renders the views when your app needs to display them onscreen...") .padding() } |
ズレが生じています。
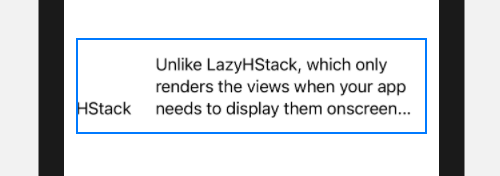
lastTextBaselineに変えてみます。
|
1 2 3 4 5 6 7 |
// .lastTextBaseline:最終行のベースラインを揃える HStack(alignment: .lastTextBaseline){ Text("HStack") // .padding() Text("Unlike LazyHStack, which only renders the views when your app needs to display them onscreen...") .padding() } |
最終行が揃いました。
spacing
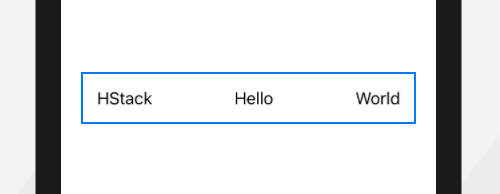
水平方向のView間の余白をCGFloatで指定します。
|
1 2 3 4 5 6 7 8 9 |
// spacing 50 HStack(spacing: 50){ Text("HStack") .padding() Text("Hello") .padding() Text("World") .padding() } |
Text() に付随するpadding()が別の余白を形成しているので外してみます。
|
1 2 3 4 5 6 |
// spacing 50, no padding() HStack(spacing: 50){ Text("HStack") Text("Hello") Text("World") } |

尚、padding() は上下左右に細かく設定することも可能です。
また、マイナスの設定もでき、上下の位置が逆転します。
|
1 2 3 4 5 6 7 8 9 |
// spacing -150 HStack(spacing: -150){ Text("HStack") .padding() Text("Hello") .padding() Text("World") .padding() } |

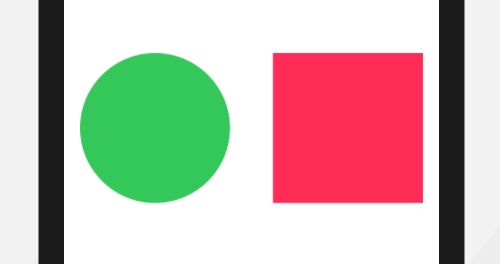
Spacer()
Spacer()を使うと左寄せや右寄せが可能となります。
例えば、”HStack” を左寄せするには、
|
1 2 3 4 5 6 7 8 9 10 11 |
var body: some View { HStack{ Text("HStack") .padding() Spacer() Text("Hello") .padding() Text("World") .padding() } } |

これは、画面サイズを計算せずに左右に寄せてレイアウトしたい場合などに役立つかもしれません。
|
1 2 3 4 5 6 7 8 9 10 11 12 13 14 15 16 |
HStack{ Circle() .fill(Color.green) .frame(width: 150, height: 150, alignment: .center ) .padding() Spacer() Rectangle() .fill(Color.pink) .frame(width: 150, height: 150, alignment: .center) .padding() } |
background
HStack内のView領域を背景色で色付けしてみましょう。
|
1 2 3 4 5 6 7 8 9 10 |
// background HStack { Text("HStack") .padding() Text("Hello") .padding() Text("World") .padding() } .background(Color.yellow) |

Color.yellow で黄色を指定しましたが、他の固定色は以下です。
- Color.black
- Color.blue
- Color.gray
- Color.green
- Color.orange
- Color.pink
- Color.red
- Color.white
- Color.yellow
frame
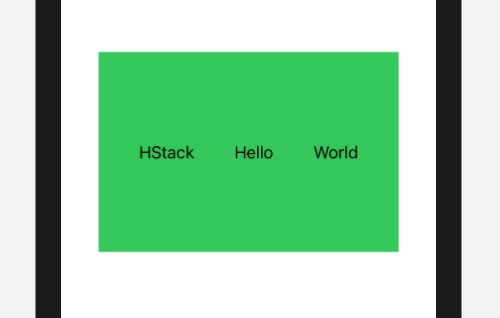
HStackの領域をframeを使って限定してみます。
|
1 2 |
// frame の 横幅、縦長、フレーム内での位置 frame(width: CGFloat, height: CGFloat, alignment = .center) |
これを使ってHStackを使うとこうなります。
|
1 2 3 4 5 6 7 8 9 10 11 12 13 14 |
// frame HStack { Text("HStack") .padding() Text("Hello") .padding() Text("World") .padding() } .frame(width: 300, height:200, alignment:.center ) .background(Color.green) |
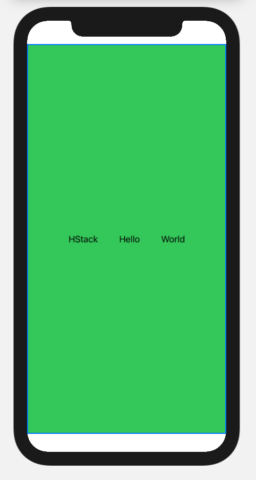
またframeをSafe Areaまで広げることもできます。
|
1 2 3 4 5 6 7 8 9 10 11 |
HStack{ Text("HStack") .padding() Text("Hello") .padding() Text("World") .padding() } .frame(maxWidth: .infinity, maxHeight: .infinity) .background(Color.green) |
Divider
HStackを分割するラインを Diver() を使って引くことができます。
|
1 2 3 4 5 6 7 8 9 10 |
HStack{ Text("HStack ") .padding() Divider() Text("Hello") .padding() Divider() Text("World") .padding() } |
細い線ですが分割されています。
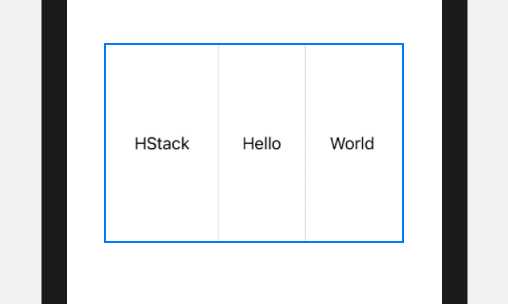
残念ながらDivider()では太さを調整できないので
frameで細長い矩形を代用するなど他の方法を使います。
References:
init(alignment:spacing:content:)
HStack | Apple Developer Documentation
VerticalAlignment | Apple Developer Documentation
padding(_:) | Apple Developer Documentation
Spacer | Apple Developer Documentation
Color | Apple Developer Documentation
frame(width:height:alignment:) | Apple Developer
Divider | Apple Developer Documentation

