地図はGoogleという方もいらっしゃると思いますが、Google Map をiOSでも使うことができます。SDKのインストールするにはいろいろなツールをインストール必要があるので確認してみます。

Xcode 9.2
Google Maps SDK for iOS
基本的にはGoogleのスタートガイドを基本に進めていきます。
Google Maps SDKのAPIをインストール
スタートガイドの情報がすこし古いのとRubyをあまり使わない開発者には前提作業がいくらかあります。まずcocapodsのインストールができるかです。
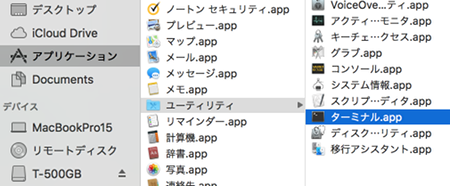
「ターミナル」を起動します。「アプリケーション」「ユーティリティ」にあります。

これでこのコマンドを入力してみます。
|
1 |
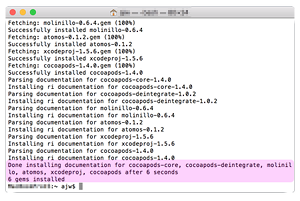
$ sudo gem install cocoapods -n/usr/local/bin |

この例のように新しくインストールされるなどであれば問題ないのですが、Rubyのバージョンが低いというエラーがでた場合はこれを試してみてください
(バージョンは適宜合わせてください)
|
1 |
sudo gem install activesupport -v 4.2.6 |
それでも解決しない場合は、こちらで設定をしてください。
CocoaPods を導入、rubyを設定をする
Podfileの作成
Xcodeでプロジェクトを作成して、その直下に以下のようなファイルを作り、「Podfile」(拡張子無し)というファイル名で置きます。
例)
|
1 2 3 4 5 |
source 'https://github.com/CocoaPods/Specs.git' target 'TestGoogleMapsSDK' do pod 'GoogleMaps' pod 'GooglePlaces' end |
targetはプロジェクト名です。
ターミナルでこのPodfileのレベルに移動してinstall
|
1 |
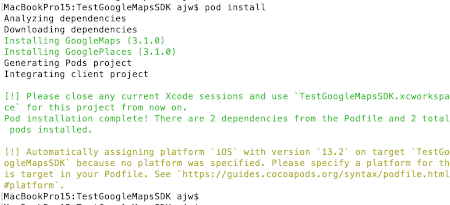
$ pod install |
このようにPods projectが生成されれば成功です

Podsフォルダーと XXX.xcworkspace が作成されています。
注意)プロジェクトを終了し、この .xcworkspaceから毎回プロジェクトを立ち上げます。
API キーの取得
APIの有効化
- Google Developer Consoleにアクセスしてログインします。
- プロジェクトを新規作成あるいは選択します。
- Google Maps SDK for iOS を有効化し、オプションで Google Places API for iOS も有効化します。
- 左のサイドバーで、[APIと認証] を選択
- API のリストで、使用しているすべての API のステータスが [有効] の表示になっていることを確認
APIの取得
- 左のサイドバーで、[認証情報] を選択します。
- プロジェクト用の iOS API キーをまだ取得していない場合は、[Add credentials] > [API key] > [iOS key] の順に選択してキーを作成します。
- 表示されるダイアログで、アプリのバンドル識別子を入力します。 次に例を示します。
com.example.hellomap - [Create] をクリックします。プロジェクトの API キーリストに、新しい iOS API キーが表示されます。 API キーは例えば次のような文字列です。
1AIzaSyBdVl-cTICSwYKrZ95SuvNw7dbMuDt1KG0
マップの追加
AppDelegateにAPIキーを設定します。
GoogleMapsをimport
AppDelegate.swift
|
1 2 3 4 5 6 7 8 9 10 11 12 13 14 15 16 17 18 19 20 21 22 23 24 25 26 27 28 29 30 31 32 33 34 35 36 37 38 39 40 41 42 |
import UIKit import GoogleMaps @UIApplicationMain class AppDelegate: UIResponder, UIApplicationDelegate { var window: UIWindow? // 取得したAPIキーを設定してください let cGoogleMapsAPIKey = "AIzaSyBdVl-cTICSwYKrZ95SuvNw7dbMuDt1KG0" func application(_ application: UIApplication, didFinishLaunchingWithOptions launchOptions: [UIApplicationLaunchOptionsKey: Any]?) -> Bool { // Override point for customization after application launch. GMSServices.provideAPIKey(cGoogleMapsAPIKey) return true } func applicationWillResignActive(_ application: UIApplication) { // Sent when the application is about to move from active to inactive state. This can occur for certain types of temporary interruptions (such as an incoming phone call or SMS message) or when the user quits the application and it begins the transition to the background state. // Use this method to pause ongoing tasks, disable timers, and throttle down OpenGL ES frame rates. Games should use this method to pause the game. } func applicationDidEnterBackground(_ application: UIApplication) { // Use this method to release shared resources, save user data, invalidate timers, and store enough application state information to restore your application to its current state in case it is terminated later. // If your application supports background execution, this method is called instead of applicationWillTerminate: when the user quits. } func applicationWillEnterForeground(_ application: UIApplication) { // Called as part of the transition from the background to the inactive state; here you can undo many of the changes made on entering the background. } func applicationDidBecomeActive(_ application: UIApplication) { // Restart any tasks that were paused (or not yet started) while the application was inactive. If the application was previously in the background, optionally refresh the user interface. } func applicationWillTerminate(_ application: UIApplication) { // Called when the application is about to terminate. Save data if appropriate. See also applicationDidEnterBackground:. } } |
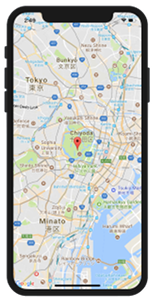
スタートガイドを参考に皇居辺りのマップを表示してみます。
GoogleMapsをimport
ViewController.swift
|
1 2 3 4 5 6 7 8 9 10 11 12 13 14 15 16 17 18 19 20 21 22 23 24 25 26 27 28 29 |
import UIKit import GoogleMaps class ViewController: UIViewController { override func viewDidLoad() { super.viewDidLoad() let camera = GMSCameraPosition.camera(withLatitude: 35.68154, longitude: 139.752498, zoom: 13) let mapView = GMSMapView.map(withFrame: CGRect.zero, camera: camera) mapView.isMyLocationEnabled = true self.view = mapView let marker = GMSMarker() marker.position = CLLocationCoordinate2DMake(35.68154,139.752498) marker.title = "The Imperial Palace" marker.snippet = "Tokyo" marker.map = mapView } override func didReceiveMemoryWarning() { super.didReceiveMemoryWarning() // Dispose of any resources that can be recreated. } } |
これで地図が表示されました。

関連ページ:
- MapKitで地図の表示
- 現在地をMapKitで地図表示する
- Google Maps SDK for iOS を使って地図を表示する
References:
スタートガイド | Google Maps JavaScript API | Google Developers
Install a Google SDK using CocoaPods | Google APIs for iOS | Google …