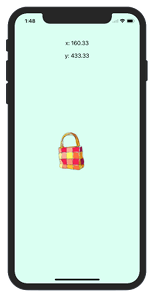
画像を指でドラッグさせるなどは、スマホになってできるようになった画期的な機能ですがどのようにプログラムするのでしょうか?意外と簡単です、簡単に使えるように設定されてます。

Xcode 13.4.1
touchesBegan/touchesMoved/touchesEnded
drag させるには
|
1 2 3 4 5 6 7 8 |
// 画面にタッチで呼ばれる override func touchesBegan(_ touches: Set<UITouch>, with event: UIEvent?) {} // ドラッグ時に呼ばれる override func touchesMoved(_ touches: Set<UITouch>, with event: UIEvent?) {} // ドラッグ終了 override func touchesEnded(_ touches: Set<UITouch>, with event: UIEvent?) {} |
これを使います
移動の座標は
|
1 2 3 |
// ドラッグ後の座標 let newDx = touchEvent.location(in: self.view).x let newDy = touchEvent.location(in: self.view).y |
のように使います
指の移動がtouchMovedで座標の変化となり、その座標にUIImageViewのFrame位置を合わせていくと指に引きずられていくような効果になります。
まとめると
ViewController.swift
|
1 2 3 4 5 6 7 8 9 10 11 12 13 14 15 16 17 18 19 20 21 22 23 24 25 26 27 28 29 30 31 32 33 34 35 36 37 38 39 40 41 42 43 44 45 46 47 48 49 50 51 52 53 54 55 56 57 58 59 60 61 62 63 64 65 66 67 68 69 70 71 72 73 74 75 76 77 78 79 80 81 82 83 84 85 86 87 88 89 |
import UIKit class ViewController: UIViewController { @IBOutlet var labelX: UILabel! @IBOutlet var labelY: UILabel! // 画像インスタンス let imageBag = UIImageView() override func viewDidLoad() { super.viewDidLoad() // Screen Size の取得 let screenWidth:CGFloat = view.frame.size.width let screenHeight:CGFloat = view.frame.size.height // ハンドバッグの画像を設定 imageBag.image = UIImage(named: "handbag") // 画像のフレームを設定 imageBag.frame = CGRect(x:0, y:0, width:128, height:128) // 画像をスクリーン中央に設定 imageBag.center = CGPoint(x:screenWidth/2, y:screenHeight/2) // タッチ操作を enable imageBag.isUserInteractionEnabled = true self.view.addSubview(imageBag) // 小数点以下2桁のみ表示 labelX.text = "x: ".appendingFormat("%.2f", screenWidth/2) labelY.text = "y: ".appendingFormat("%.2f", screenHeight/2) // 画面背景を設定 self.view.backgroundColor = UIColor(red:0.85,green:1.0,blue:0.95,alpha:1.0) } // 画面にタッチで呼ばれる override func touchesBegan(_ touches: Set<UITouch>, with event: UIEvent?) { print("touchesBegan") } // ドラッグ時に呼ばれる override func touchesMoved(_ touches: Set<UITouch>, with event: UIEvent?) { // タッチイベントを取得 let touchEvent = touches.first! // ドラッグ前の座標, Swift 1.2 から let preDx = touchEvent.previousLocation(in: self.view).x let preDy = touchEvent.previousLocation(in: self.view).y // ドラッグ後の座標 let newDx = touchEvent.location(in: self.view).x let newDy = touchEvent.location(in: self.view).y // ドラッグしたx座標の移動距離 let dx = newDx - preDx print("x:\(dx)") // ドラッグしたy座標の移動距離 let dy = newDy - preDy print("y:\(dy)") // 画像のフレーム var viewFrame: CGRect = imageBag.frame // 移動分を反映させる viewFrame.origin.x += dx viewFrame.origin.y += dy imageBag.frame = viewFrame self.view.addSubview(imageBag) // 小数点以下2桁のみ表示 labelX.text = "x: ".appendingFormat("%.2f", newDx) labelY.text = "y: ".appendingFormat("%.2f", newDy) } override func didReceiveMemoryWarning() { super.didReceiveMemoryWarning() // Dispose of any resources that can be recreated. } } |
例として、handbag@2x.jpg の画像をAssets.xcassets に入れました。
あるいは 「Add Files to …」で取り込むことでも可能です。
X, Y座標をも表示するために、ストーリーボードで UILabel 2つを配置
それぞれ labelX, labelYと紐付けすれば、画像のドラッグができるようになります
関連ページ:
- UIImageView の設定(コードで記述
- ストーリーボードを使った画像 UIImageView の設定
- 画像の拡大縮小 (CGRectMake)
- CGAffineTransform:画像を回転、移動、反転
- アニメーション(パラパラマンガ)
- Image, Text の合成
- 画像をドラッグさせる
- UIImage の使い方
- 画像をぼかす、モザイク化する
- CABasicAnimationを使たアニメーション
- cornerRadiusを使って画像を角丸にする
References:
touchesBegan(_:with:) – UIResponder | Apple Developer Documentation
UIImageView – UIKit | Apple Developer Documentation
UIImage – UIKit | Apple Developer Documentation