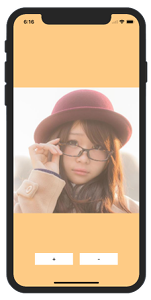
画像の拡大縮小は CGAffineTransform を使うこともできますが、CGRectを使って手軽に拡大・縮小する方法について考えてみます。

CGRect 画像のサイズ変更、拡大縮小
基本的なコンセプトは画像の 幅、高さ を取得し、それにスケールファクターを掛けて拡大と縮小の画像を表示させます。
CGRectは位置とサイズの両方を管理するクラス、CGRectの引数として開始位置 x,y と幅と高さを設定します。
例として、始点座標が(0,0)で横幅が200、縦幅300の矩形領域を設定するとこうなります。
|
1 |
let rect:CGRect = CGRect(x:0, y:0, width:200, height:300) |
これをImgeViewのframeに設定し画像をセットします。
|
1 |
imageView.frame = rect; |
例えばこのframeを2倍、1/2にリサイズすればいいわけです。(ここでは画像の縦横比アスペクト比はそのままとします。)
- 画像の横幅を取得
- 画像サイズのCGRectを作成
- UIImageViewのframeに設定して画像を入れる
- 画像を拡大するには、このCGRectをアスペクト比を維持して大きくする
実際のコードではこうなります
ViewController.swift
|
1 2 3 4 5 6 7 8 9 10 11 12 13 14 15 16 17 18 19 20 21 22 23 24 25 26 27 28 29 30 31 32 33 34 35 36 37 38 39 40 41 42 43 44 45 46 47 48 49 50 51 52 53 54 55 56 57 58 59 60 61 62 63 64 65 66 67 68 69 70 71 72 73 74 75 76 77 78 79 80 81 82 83 84 85 86 87 88 89 90 91 92 93 94 95 96 97 98 99 100 101 102 103 104 105 106 107 108 109 |
import UIKit class ViewController: UIViewController { var imageView:UIImageView! var scale:CGFloat = 1.0 var width:CGFloat = 0 var height:CGFloat = 0 var screenWidth:CGFloat = 0 var screenHeight:CGFloat = 0 override func viewDidLoad() { super.viewDidLoad() // Screen Size の取得 screenWidth = self.view.bounds.width screenHeight = self.view.bounds.height // UIImage インスタンスの生成 let image = UIImage(named:"img")! // 画像の幅・高さの取得 width = image.size.width height = image.size.height // UIImageView インスタンス生成 imageView = UIImageView(image:sample_image) // 画像サイズをスクリーン幅に合わせる scale = screenWidth / width let rect:CGRect = CGRect(x:0, y:0, width:width*scale, height:height*scale) // ImageView frame をCGRectで作った矩形に合わせる imageView.frame = rect; // 画像の中心をスクリーンの中心位置に設定 imageView.center = CGPoint(x:screenWidth/2, y:screenHeight/2) // view に ImageView を追加する self.view.addSubview(imageView) // ボタンを2つ生成 let buttonPlus = UIButton() let buttonMinus = UIButton() // ボタンの位置とサイズを設定 buttonPlus.frame = CGRect(x:screenWidth/4-30, y:screenHeight-100, width:screenWidth/4+20, height:35) buttonMinus.frame = CGRect(x:screenWidth/2+10, y:screenHeight-100, width:screenWidth/4+20, height:35) // ボタンのタイトルを設定 buttonPlus.setTitle("+", for:UIControl.State.normal) buttonMinus.setTitle("-", for:UIControl.State.normal) // タイトルの色 buttonPlus.setTitleColor(UIColor.black, for: .normal) buttonMinus.setTitleColor(UIColor.black, for: .normal) // 背景色 buttonPlus.backgroundColor = UIColor.white buttonMinus.backgroundColor = UIColor.white // タップされたときのaction buttonPlus.addTarget(self, action: #selector(ViewController.plus(sender:)), for: .touchUpInside) buttonMinus.addTarget(self, action: #selector(ViewController.minus(sender:)), for: .touchUpInside) // Viewにボタンを追加 self.view.addSubview(buttonPlus) self.view.addSubview(buttonMinus) // 画面背景を設定 self.view.backgroundColor = UIColor(red:1.0,green:0.8,blue:0.5,alpha:1.0) } // 画像拡大 @IBAction func plus(sender: Any) { if(width*scale < screenWidth*2 ){ scale += 0.2 } let rect:CGRect = CGRect(x:0, y:0, width:width*scale, height:height*scale) imageView.frame = rect; imageView.center = CGPoint(x:screenWidth/2, y:screenHeight/2) self.view.addSubview(imageView) } // 画像縮小 @IBAction func minus(sender: Any) { if(width*scale > screenWidth/4){ scale -= 0.2 } let rect:CGRect = CGRect(x:0, y:0, width:width*scale, height:height*scale) imageView.frame = rect; imageView.center = CGPoint(x:screenWidth/2, y:screenHeight/2) self.view.addSubview(imageView) } } |
sample_image.jpg 画像を用意して、Retinaに対応させるために 「@2x」を名前に追加
Assets にコピペします。

ビルドして実行してみましょう。
画像の拡大・縮小はCGAffineTransformを使っても可能です。
CGAffineTransform:画像を回転、移動、反転
関連ページ
- UIImageView の設定(コードで記述)
- ストーリーボードを使った画像 UIImageView の設定
- 画像の拡大縮小 (CGRect)
- CGAffineTransform:画像を回転、移動、反転
- アニメーション(パラパラマンガ)
- Image, Text の合成
- 画像をドラッグさせる
- UIImage の使い方
- 画像をぼかす、モザイク化する
- CABasicAnimationを使たアニメーション
- cornerRadiusを使って画像を角丸にする
References:
CGRect – Core Graphics | Apple Developer Documentation
UIImageView – UIKit | Apple Developer Documentation
UIImage – UIKit | Apple Developer Documentation